Loading...
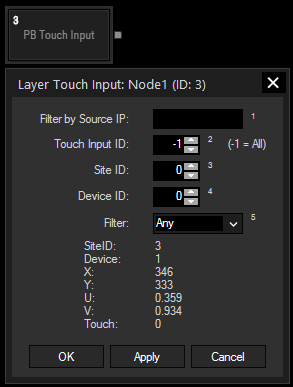
The Layer Touch Input node provides single- and multi-touch point feedback from a Pandoras Box system with activated "Input Events". In difference to the Layer Interaction node, this node can filter data based on the Touch Input, Site or Device ID whilst the Layer Mouse input works with single-touch input and mouse inputs.
The node can be found under Nodes > Input Nodes > Pandoras Box > Layer Touch Input

The chapter "Picking Mode" explains what to set up on Pandoras Box side but also in Widget Designer.
In short:
- PB Manager includes "Widget Designer Device" in Device Tree
- PB Manager or Client > Input Event Settings > "Output" and "Widget Designer Device" activated
- PB Manager in Picking Mode or Client connected to touch device
- WD > PB Network Configuration > connected to Manager and "Enable Connections" to Widget Designer Device => "Input Tester"shows data
If you are interested in sending touch data to a Pandoras Box (drawing) Canvas, please see the chapter "Layer UV Draw to Canvas".
Optionally, enter the IP from the Pandoras Box Manager, otherwise the Manager connection from the PB Network Configuration works.
Enter an Input ID if you would like to see data from this input only. Enter "-1" if all inputs should be processed. See the data protocol in the Input Tester dialog if your touch device sends a touch input ID.
Enter a Site ID from Pandoras Box, see "Filter".
Enter a Device ID from Pandoras Box, see "Filter".
Set the Filter option to "Site" to process only the input data sent by the Site ID entered above.
Set the Filter to "Site Device" to filter incoming data even more, that is to receive only feedback from the Site and Device ID entered above.
If the Filter is set to "Any" you will see unfiltered data from all Sites and Devices.
With Widget Designer version 6, all nodes support so called node commands. Node commands access functions (i.e methods) from a node and / or set a parameter (i.e. property).
Enter "node", followed by the according ID and a dot and a list will pop up showing all available commands for the node. For instance, Node1.TintColor.SetRGB(125,0,255), colors the node in purple.
In addition, the node properties with a parameter ID (the small superscript number) can be edited via the command Node1.SetParam(ID,new Value) or WDNodeSetParam(NodeID,ParamID,Value).connected
The Node generates the following output: (For an explanation regarding this data, please scroll down in the chapter "Picking Mode" and see the options in the dialog PB Network Configuration.
- Site
- Device
- ScreenX
- ScreenY
- TextureU
- TextureV
- Touched