Loading...
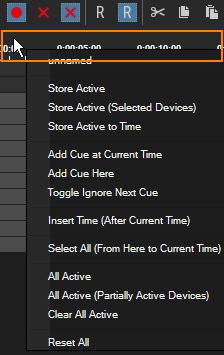
This chapter describes all commands from the Sequence tab. The commands are available in the Button Bar above the timeline, or in the context menus that pop up when you right-click in the time bar or on a container.
You will also find the according keyboard shortcut for a command if available. Please see the topic Keyboard shortcuts for a complete list of all shortcuts available in Pandoras Box.
Above the Sequence tab you will find a button bar, offering the most used commands in an easy and fast accessible way. From left to right:
![]()
The + and - buttons can be clicked once or hold down for continues zoom. The slider can be either dragged or moved with a single click.
Right-click the zoom level number to choose a zoom level from the drop-down or double-click it to enter a custom value.
This zooms to the level of currently selected items (Containers or Keys).
This toggles the "AutoScoll" option of a Sequence which follows the Nowpointer in Play mode. You can also change it in the Sequence Inspector.

This command stores all active values at the current time.
The keyboard shortcut is [Ctrl + Alt + S] and the command is also available in the context menu from the time bar or Device Tree tab.
This command stores active values at the beginning of the container.
The keyboard short is [Ctrl + Alt + W] and the command is also available in the context menu from the timeline or Device Tree tab.
In contrast to the above command, this one filters active values for those Devices (Layers) that are selected. The values are stored at the current time at the blue Nowpointer. All active values influencing other layers will stay active.
The keyboard shortcut is [Ctrl + Alt + D] and the command is also available in the context menu from the time bar or Device Tree tab.
This command stores active values for those Devices (Layers) that are selected at their container start. All active values influencing other layers will stay active.
The keyboard shortcut is [Ctrl + Alt + E] and the command is also available in the context menu from the time bar or Device Tree tab.
This command de-activates the active status off all parameters. The values will be kept and not set back to default.
The keyboard shortcut is [Ctrl + Alt + C] and the command is also available in the context menu from the time bar or Device Tree tab.
This command De-activates the active status off all parameters of the selected Device(s). The values will be kept and not set back to default.
The command is also available in the context menu from the Device Tree tab.
This command resets all parameters to their default values and removes their active status.
The keyboard shortcut is [Ctrl + Alt + R] and the command is also available in the context menu from the time bar or Device Tree tab.
This command resets all parameters of the selected Device(s) to their default values and removes their active status.
The command is also available in the context menu from the Device Tree tab.

This command cuts selected keys, containers or cues. To select an item you can either click on it or draw a selection box around it. Hold the [Alt] key for selecting cues.
The keyboard shortcut is [Ctrl + X]
Copy
This command copies keys, containers or cues. To select an item you can either click on it or draw a selection box around it. Hold the [Alt] key for selecting cues.
The keyboard shortcut is [Ctrl + C]
Paste
This command pastes keys, containers or cues to the same Device(s) or current time of the Nowpointer.
The keyboard shortcut is [Ctrl + V]

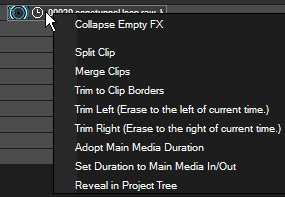
This command erases everything between the Nowpointer and the left clip boarder. The last key of a parameter before the Nowpointer will be moved to the new clip boarder time. The video clip will now be shortened at the beginning.
The command is also available in the Container's context menu.
This command erases everything between the Nowpointer and the right clip boarder. There will be a new key set at the right clip boarder containing the value a parameter had at the Nowpointer before.
The command is also available in the Container's context menu.
If a clip container was scaled down, there could be hidden keys beyond the clip borders. The command Trim To Clip Borders will remove these hidden keys and sets new keys at the left and right clip border to ensure the wanted behavior in the visible part of the clip.
The command is also available in the Container's context menu.
You may split one clip at the Nowpointer's position.
The command is also available in the Container's context menu.
If you have several containers selected within the same track, you may merge them. If they have different options regarding Lock to time or free-run, media file, mesh file etc., the first container in time overwrites other settings.
The command is also available in the Container's context menu.

This command adopts the duration of the clip if it was shortened/extended or replaced by another clip with different duration before.
The command is also available in the Container's context menu.
There are two different modes how a container clip is played back, the mode is depicted by a small icon in the container.
Per default, "Lock To Time" is enabled. The clip icon is a clock. In this mode, the clip synchronizes to the timeline. If the Nowpointer is paused inside the container, the clip playback is also paused. If you have programmed video playback keys, the Sequence playback overrides them.
Otherwise the container is in "Free-run" mode. The clip icon is a running-stick-figure. In this mode, the clip playback does not depend on the Sequence playback mode. As soon as the Nowpointer enters the container, its video playmode keys (play once, play loop, pause, stop) take effect.
The default value for Video Layer Playback Transport is Play Loop in "Free run" Mode.
To switch the mode, you can also use the "Lock To Time" option in the Clip Inspector.
These buttons add a Play, Pause, Wait, or Jump Cue at the current time, indicated by the blue Nowpointer. The paragraph "Cues" of the next chapter explains the difference between those Cues. The added Cue is automatically selected and its properties are displayed in the Inspector tab.
The command (to add a Play Cue) is also available in the context menu from the time bar.
To create a Tech Cue using the sequence bar, click on the option 'T-Toggle cue type' and place any of the cues on the timeline (play, pace, jump, wait). To create a Tech Cue using the timeline, select the option 'T'. Then right-click on the timeline and select 'Add cue at current time' or 'Add cue here'.
To change the existing cue type, in the Cue Inspector, navigate to 'Tech Cue'.

This button is only available for Sub Managers in a Multi-User environment. It activates the "Blind Mode" which detaches the Active Values and Playback status (including the time for the Nowpointer), and allows to use the partly synchronized Manager as a Blind Preview system or a Blind Programming system. For more information please refer to the Multi-User topic.
 Store Active to TimeA small dialog opens and asks for the time whereto all active values will be stored. The time can be entered in the format H:MM:SS:FF or shortened to SS:FF or even SFF. So, for example 3 seconds can be 0:00:03:00 or 03:00 or 300. Click Enter or the button [Ok] to close the dialog and save the active values. Add Cue HereThis command adds a Cue at the position of the mouse pointer (instead of the current time from the Nowpointer). The Cue is automatically selected and its properties are displayed in the Inspector tab. Toggle Ignore Next CueClick here to ignore the next (upcoming) Cue in the Sequence or to respect this Cue again if it was set to be ignored. An ignored Cue is displayed in orange. Insert Time (After Current Time)A small dialog opens and asks for the time interval which will be inserted after the current time indicated by the blue Nowpointer. The time can be entered in the format H:MM:SS:FF or shortened to SS:FF or even SFF. So, for example 3 seconds can be 0:00:03:00 or 03:00 or 300. Click Enter or the button [Ok] to close the dialog and insert the time. Select All (From Here To Current Time)This selects all keys, containers and cues that lay between the time where the mouse pointer clicked and the Nowpointer. All ActiveThis command sets all parameters of all Devices to active. All Active (Partially Active Devices)This command sets all parameters of partially active devices to active. |
 Collapse Empty FXWhen there are effects added to the layer without being used, this command collapses expanded sub folders from effects. Set Duration to Main Media In/OutThis is of interest when you have shortened the duration of the media, e.g. by modifying the In- or Outpoint. The command will set the container length according to the resulting duration between the In- and Outpoint. Reveal in Project TreeThis selects the file assigned as the Main Media in the Project tab which in return also shows according information in the Inspector. |