Loading...
This topic explains how to generate keys and containers in the sequence and how to edit them, i.e. select, move and change them. If you are new to Pandoras Box, please check the introductory chapter "Sequence" for the general explanation how to navigate in the Sequence tab and what is meant when talking about a Site, Container, Key etc.
At the end, there is also an explanation of teh advanced technique that toggles the key mode.
The shortcut [Ctrl + Z] will undo steps of sequence editing, except for Toggle Key mode and active values.
Before working in the Sequence tab, we first need to have media files available in the Project tab. These are our sources. Please open the Assets tab (or Thumbnails tab) and drag them there. More information can be found in the linked chapters.
Next, we need some Layers in the Device Tree. These are our "outputs" to which the sources can be assigned to. Please follow the instructions from the chapter "Device Tree" as the steps vary between a stand-alone and Manager-Client setup and also depend on whether the Clients are started or not. Include the Site to the Preview (right-click menu) and toggle it open (double-click) to see the Layers in the Device Tree and the according tracks in the Sequence.
To add containers to your timeline / sequence, simply drag a media file from the Project tab onto a layer track in the Sequence tab. This results in a container that holds the information to load this file (when the Nowpointer hits the container) and to display it with an Opacity value of 255 which is 100%. When having a look in the Preview, you should see that the media file is there whenever the Nowpointer is "in" the container and not there, if the Nowpointer is outside.
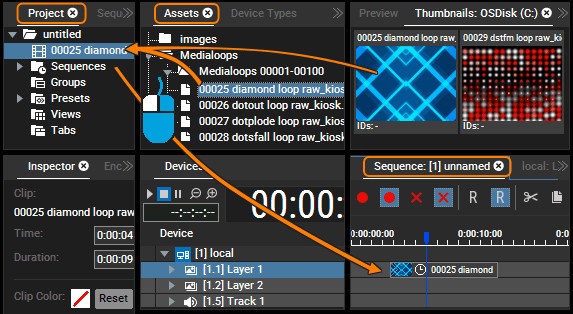
As an alternative to the above workflow, you can also work with active values. Select another layer and double-click on a media file in the Project tab. Note that the Layer and Site are highlighted in red, which indicates that there are "unstored" active values. In the Preview you should see the media file right away because active values overwrite the current values from the sequence.
Now, we want to store the active values to the timeline, which will result in a second container where each active value is stored as a parameter key. Position the Nowpointer and click the first button in the Sequence Button Bar above the timeline or use the shortcut [Ctrl + Alt + S]. See the last chapter for other ways to call the "Store active" command(s).
Now, we got two containers created in two different ways but with the same result. As said above, containers include stored layer information. Each parameter change is stored with a so called key at a certain time that holds the parameter value. The key for the "Media" parameter is special because there can only be one (main) media per container. The "Opacity" key is a regular key. Double-click the container to toggle it open and display the included parameter tracks with their keys.
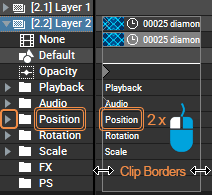 The chapter Site, Layer and Parameter Structure shows how to toggle the visibility of parameters. Later, we will add some keys and edit them, but first we will have a look how to shift Containers or their Clip borders on the left and right edge. |
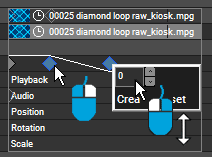
Firstly, simply right-click in the desired parameter track, e.g. next to the existing Opacity key. This creates a new key.
To change its value, right-click it again to access its parameter handle. Left-click into the number field and drag it up or down to change the value. Or, double-click the numbers and enter a new value.
You can also select a key with a left click and change its value in the key inspector tab. Once, the value is changed you will notice that the line that connects two keys adopts to the new value. The line shows the parameter value behavior over time.
The second way to create keys is to work with active values. Open the Device Controls tab and move the Opacity fader. Note that it turns red to indicate the active value state. Now, back in the Sequence tab, place the Nowpointer somewhere between the clip borders and store the value as explained above. If you place the Nowpointer outside, a new Clip would be created but without any media. By the way, a key is overwritten when you store a new active value at its time. For more advanced users: The tab Active Values gives an overview of all current active values. And the Layer Inspector includes the option to exclude a Layer from the "Store Active" command.
Most operators work with both workflows depending on the situation. Storing active values values makes most sense when storing many parameters at once, e.g. when working also with position, scale, effect parameters etc. When changing a value from an existing key the first way is probably faster.
To replace the content of a clip container without active values, drag and drop the new content from the project tab onto the clip. If the new clip has a different length, you may adopt the clip container to the new media duration. Right-click onto the clip summary container and choose "Adopt Main Media" or click the according button in the Sequence Button Bar.
To select a single key, just click on it or drag a window across it. To select multiple keys, drag a window across the region of keys.
Once selected, the keys may be moved (left click and drag selection), copied ([Ctrl + C]) and pasted ([Ctrl + V]) within the same layer or device. To copy a key within the container borders drag it whilst holding [Ctrl].
To copy a selection of keys from one device to another, use [Ctrl + C] to copy and [Ctrl + Shift + V] to paste to a new selection of devices.
Please note: If copying parameters from one device to a different device, only those parameters which are shared by both devices can be copied.
With the shortcut [Ctrl + right or left arrow], the Nowpointer jumps from key to key (including the clip borders).
More information for advanced users: In the image, the line shows, that we created a linear fade out. In case you would like to change the type of a key, e.g. to a Bezier key, select it (or multiple ones), look at the key inspector tab and change the "Curve Type". The Curve Editor allows even more fine-tuned value editing and opens when a parameter name is double-clicked in the Device Tree. The linked topic also shows how the different curve types behave.
Last, if you are interest in working with "Key Presets", the chapter "Presets" explains how to do this.
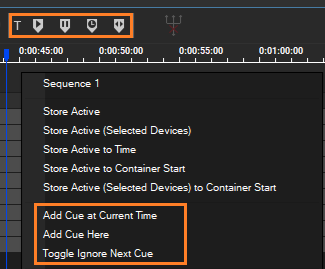 To add a Cue, you can either right-click in the time bar to open the context menu and choose "Add Cue Here" which will add a Play Cue at the time where you clicked. On the other hand, "Add Cue at Current time" adds a Cue to the Nowpointer's time. The Cue is automatically selected and its properties are displayed in the Inspector tab where the type (see below) can be changed if needed. Note: If the "T" in front of the Cue icons is activated, Tech Cues are created. Alternatively you can place the Nowpointer at a certain time and choose one of the Cue buttons in the Sequence Button Bar. |
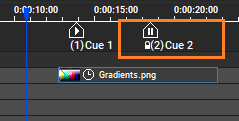 |
The Play Cue does not change the sequence playback mode, it can be understood as a simple marker. PB can be controlled externally, e.g. via DMX or Widget Designer, and mostly there are commands that tell the Sequence to jump to a certain Cue number. |
 Even more information can be found in the Cue Inspector. |
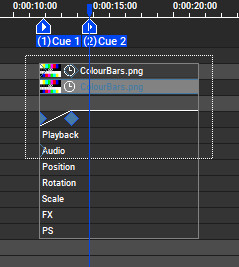 To select both, cues and keys hold down the [Alt] key whilst drawing a selection box as seen in the left image. With the shortcut [Ctrl + Alt + right or left arrow], the Nowpointer jumps from cue to cue. The tab "Cues" gives an overview of all Cues and allows fast changes. |
 |
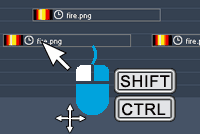
Moving the mouse up and down results in shifting the container(s) to another layer. The container changes the color to warn if it is another layer type and parameters will be discarded. If you want to make sure that the container stays on the same layer, press [Shift] whilst dragging the container. To copy the container, press [Ctrl] instead of [Shift].
Just like cues, containers can also be locked against moving in the container inspector. Containers then get a lock symbol next to the thumbnail  .
.
Clip containers can be stretched in time by selecting the clip container borders and moving them with the mouse. Again, a pop-up displays the relative time and you can snap to cues and to the borders of other containers. You can also select the container and change its value in the clip summary inspector tab.
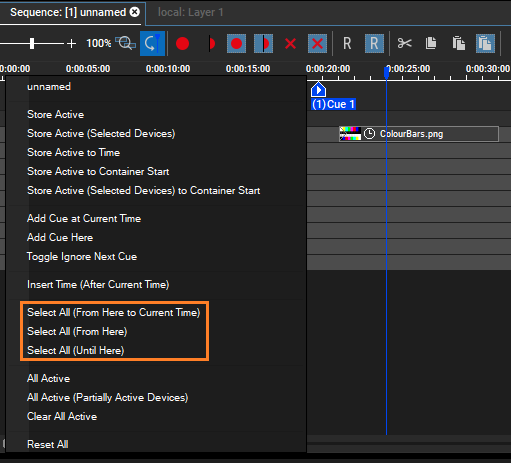
To make it easier to select containers, cues, and keys on the timeline, there are two new options:
-"Select All (From Here to Current Time)": This selects everything between where you clicked in the timeline and the Nowpointer's position.
-"Select All (From Here)": This selects everything between where you clicked in the timeline and the end of the timeline.
-"Select All (Until Here)": This selects everything between sequence start and Nowpointer.
There is also a shortcut to select all Cues, Keys and Containers appearing directly after the Nowpointer "Ctrl + End".
To simplify the editing of multiple containers on the timeline, they can also be grouped. The grouping works like a permanent multi-selection. The containers belonging to a group are marked with an orange frame when selected. If only the container boundary of a group member is selected, only the corresponding boundaries of the other containers are selected and can be edited.
To create a group, you have to select several containers, no matter what kind, and then combine them as a group via context menu  . A group can be dissolved in the same way. For both actions, the shortcut "Crtl + G" works. If a container is to be added to a group later, the existing group must first be dissolved. After dissolving, the former group members are still selected in a multi-selection (blue frame). At this point, you can add more containers to the multi-selection and create a group again.

By selecting a member of the group, all group containers are selected and can be moved or edited in the Inspector. When moving the group, the correlations between the containers are preserved. To change the relationship between containers, you must click a container a second time. This single container is selected and has an orange frame to further indicate the group membership. In this state, the position or length of the container can be changed. These changes are then applied to the group for this container.
Groups can be selected for copying, but then only the containers are copied. The copies of the containers do not belong to a group then.
Groups are saved in the project file.
While multiple containers/keys are under selection, you can delete the clips from the selected layer or even from the hidden layers.
When unchecking the sequence from the Device Tree, a warning message appears prompting deletion confirmation.

If you want a parameter value to be applied for the whole sequence or many Containers at once and not to be set up for each single clip, you can take it out of the "clip orientated" key mode. Simply right-click on the parameter in the Device Tree and choose "Toggle Key Mode". This command cannot be undone! Confirm with "OK" and the clip boarders are no longer effective for this parameter.
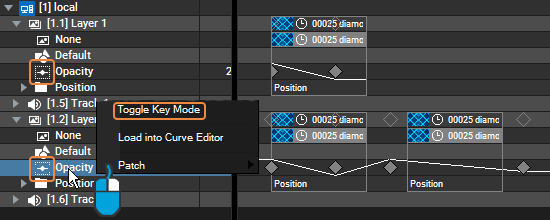
You can toggle the parameter back to the clip orientated key mode at any time. In that case Pandoras Box will add new keys at any clip border.
The next chapter explains the advanced technique that changes how default parameter values for all parameters in a Sequence are defined.