Loading...
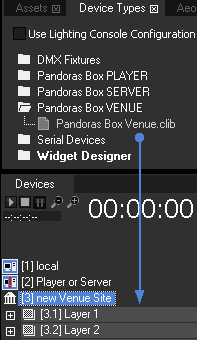
A Venue Site can be added from the Device Types tab to the Devices tab respectively the Sequence. In difference to normal Sites a Venue Site is never real hardware like a Server. The purpose of a Venue Site is rather pure (pre-)visualization. It renders your programming (i.e. final composition) on 3D objects that form a virtual copy of your stage. That turns the Preview tab from being an abstract image to a very real representation of what is happening on stage. Understanding Venue Sites requires also to know about similarities and differences of them to other Clients like Servers. |
 Unlike other clients, a Venue Site cannot connect to another system and thus the Inspector does not offer settings like "IP address" etc. But in the whole, the Venue Site Inspector equals the Device Inspector. A Venue Site can be toggled to be rendered in the Preview tab. Right-click on the Venue Site in the Device Tree and choose "Toggle Preview" and note that the symbol is now shaded in blue. All Cameras and Outputs from previewed sites appear in the drop-down list in the Preview's upper right corner. Choose the Venue Site Camera. The main purpose of a Venue Site is to render content from other Clients, which means that their Camera and Output textures are routed to the Venue Site. Now, we will assign content to a Venue Site layer. |
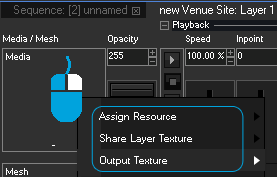
 Assign Resource: shows a list with all media files added to the Project tab (you can of course also drag it from there onto the layer or assign it via a double-click) Share Layer Texture: shows a list with all layers from the Venue Site; select one to share its current texture with this layer Output Texture: shows a list with all available camera and output textures from clients that are added to the Device Tree and toggled into the preview (!) This option is probably the one most used with Venue Sites. Besides the texture, you would mostly apply a 3D object to a Virtual Layer too. The object represents a part of your stage. This can be for instance a flat 2D object representing a display, or it can be a curved object representing a curved projection screen. You could then share the camera or output texture from the client that also renders the real content for the respective display or screen. You can of course also assign other objects visible on the stage like a chair object, moving head object, human object, etc. and then assign a "normal" media file to the Venue Site layer, e.g. a brown image for the chair or the texture that belongs to the 3D object and fits to its UV mapping. |
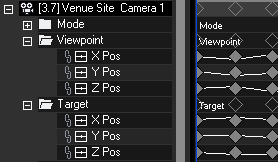
 You may also preview a Venue Camera and animate it on the timeline. Remember to toggle the Venue Site and all clients into the preview and to select the Venue Site camera with the drop-down menu in the upper right corner of the Preview tab. This way you can fly through your 3D stage and look at the content from different angles. Of course you can always export this animation using the Video Export feature. And it is possible to add further cameras with a right-click on the Venue Site in the Device Tree and program another fly through with other perspectives. As with other sites, all settings for Venue Sites can be kept as active values or be stored to the timeline in form of containers. Or you remote control them using for instance the Widget Designer. |
First, add a Light Layer to your Venue Site with a right-click on it in the Device Tree > Add Device > Light. The light represents the projector. The light controls like position stand for the projector's position and the field of view, represents the lens FOV. The projectors image is of course a camera texture from another site. Now you need another Venue Site layer with a 3D object that represents the real screen. The left image depicts a layer with a white media file and a 3D object for a wide projection screen. A light effect was added to the layer to "receive" the projector's light. The example uses the effect "1 Light Mat-Spec-Color", the Mix fader is set to 255, the Mode to "Cast &Receive" and the above added Light Layer is set to be the source (right-click into the media field > Share Layer). |
A sample project can be found in C:\Christie\content\projects\VenueSites_Training_Stage (or C:\coolux\...). In version 6, please use the Import function to load it. |