Loading...
Before you start moving the control points you have to decide with how many FFD control points and mesh segments you should work. Please follow this link if you are not sure about the difference between FFD and mesh. The FFD count is set up via the File menu and the mesh count in the Mesh tab. The perfect amount depends on your screen surface and outline.
The more warping projects you have done, the faster you will be able to tell the best FFD and mesh count. If you are not sure in the beginning, simply make a guess and start warping. You will see quite fast, that you have picked too many or too less FFDs. Too many FFD points are not that bad, it might take more time during the FFD-phase but you could save time during the mesh-phase - at least if not way too many FFDs were picked. If you have picked too less FFD points you will notice that you will have to move mesh points at a very early stage of warping. This will definitely be more time-consuming than starting all over with a new mesh. In addition, it is easier to obtain a good quality mesh (as described below) with FFDs instead of offsetting single mesh points too far. If you want to, you can save the current project and have a quick look whether a new mesh with more FFDs does give you better results and eases your work. This can be found out in a few seconds but save minutes or even hours.
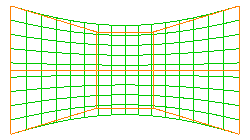
 A simply bend screen will go well with only 3 vertical FFD control points. Horizontally there needs to be done more warping, thus 4 FFDs work better. The more smooth the outline has to be, the more horizontal mesh segments you should take. In this case there are 20 mesh segments. |
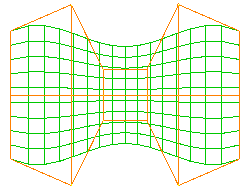
 Curved screens that are more complex will be easier to handle if you increase the amount of FFD control points. In this case there are 6 horizontal control points and still 3 vertical ones. The curved outline of the mesh is the result by only moving the FFD control points. |
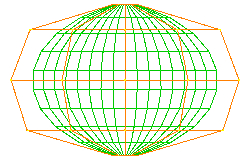
 Spherical screens are bend in all directions. They require to increase the amount of vertical FFD points as well. In the depicted example a mesh with an 5x5 FFD is shown. If the projector looks straight on the equator, the mesh deformation will be quite homogenous and the FFD should look similar to the example. |
The amount of mesh segments can be altered as long as working only with the FFD control points. As soon as a mesh point is moved, the amount should not be changed any more.
In general, the amount of mesh segments depends on how exact the warp needs to be. Firstly this is a question how complex or detailed the screen is, including the outline, as shown in the above example with the simply bend screen. If the screen is quite flat itself but has a very detailed outline, it could be a faster solution to create a mask instead of increasing the mesh count.
Secondly, it is important whether you are projecting with single projectors only, or if several projectors overlap each other. Within the softedge area the pixels from both projectors must overlay each other perfectly. This requires a higher mesh count. As a rule of thumb, at least 7 mesh segments should lie within the overlap area.
By the way, it could be helpful to work with mesh segments that have the same height as width. If your projector has an aspect ratio of 16:9, you could set up a mesh count of 16 by 9 during the FFD-phase and increase it to 32 by 18 or even 48 by 27 before starting the mesh-phase.
A good quality mesh refers to a mesh where the mesh lines are uniformly distributed on the screen. For example, if the screen is 2m wide, and there are 20 horizontal mesh segments, each segment should be 10cm wide. If this is not achieved sufficiently, and you project text that moves across the screen, it would scroll unevenly. Wherever there are smaller distances between mesh lines, the text would be smaller too. Wherever there are larger meshes, the text is enlarged.
If your content does not contain critical movements or visible geometrical forms, you can warp a little more rough. So before you start warping, or before you spend too much time within the last phase, check the content and decide how perfect the result really needs to be.
For some people it is quite hard to perceive equal distances. To fasten and ease the warping workflow, try to mark certain points on the screen. If you mark for example every 40cm with tape, it will be much easier to arrange the mesh equally. If you cannot tape on the screen, a rotatory laser can be helpful as well.
For the same reason it can be worth the time to create special test patterns. This is definitely recommended when projecting on complex geometries and the later on used content refers to the geometry.
Keeping this mind we can now start warping. The golden rule is always to warp as much as possible with the FFD, but not more than necessary. Or in other words: the FFD is for the coarse adjustment and the mesh for fine-tuning.
Whilst moving the FFD points, match the mesh outline (= content outline) as good as possible with your screen outline. At the same time keep an eye on the distance between the horizontal lines and between the vertical lines. As soon as you recognize that moving an FFD point helps within a small mesh area but "destroys" an higher number of other mesh areas it is better to finish with the FFD-phase. Decide for a final mesh count and move on to moving meshes. Here you will see that the better the FFD was adjusted, the less time needs to be spend for finishing.
When warping with overlapping meshes, you are done with warping as soon as all mesh lines overlay each other. This can be seen easily when both meshes have a different colors as the resulting color will be the sum. The closer the audience sees the projection, the more perfect the overlay needs to be.
In general it is possible to do a rough warp and start programming with it in Pandoras Box. Later on, when there is enough time or when it is sure the projector or screen will not move, you can load the warp project again and finalize it.
Depending on your preference you can work either using the mouse or the keyboard, or both. For more detailed information, please see the Tools bar chapter.
|
Mouse You might have to unhide the Toolbox by clicking the key [T]. [H] hides it again. |
Keyboard You might have to unselect the Toolbox first by clicking into the Warper's main interface. |
Switch the Edit Mode |
In the Toolsbar, click on |
Use the shortcuts -[O] - [F] or - [E] |
Select points |
Select a single point by simply clicking on it. |
Navigate to another selected point with the [Up/Down/Left/Right arrow] key. |
Switch the Move Mode |
In the Toolsbar, click on |
Use the shortcuts on the main keyboard - [1] - [2] - [3] |
Toggle the Axis Locks |
In the Toolsbar, click on the according axis button |
Use the shortcuts |
Edit the selection |
To move, rotate and scale, hold the right mouse button and move the mouse up/down or left/right. |
To move, use [Shift + Up/Down/Left/Right arrow] |
When working with keyboard shortcuts, you can adjust the precision of the arrow presses for positioning the Mesh / FFD points in the toolbox section "Keyboard / Mouse".
A third alternative to edit points is to use the dialog for relative transformation. Left-click on the according mode 

 to open the dialog. Now you can enter an exact factor for each axis and press "Apply".
The next tutorials explain how to export your mesh and use it in Pandoras Box, how to work with associated meshes and how to use the live warping feature.