Loading...
 |
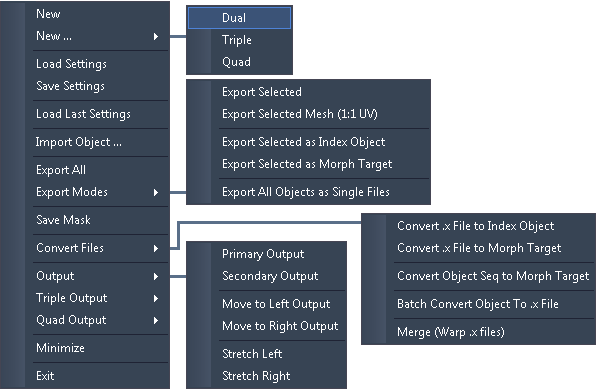 The depicted menu is the advanced one. Per default, the basic menu is shown, to get access to all options, go to |
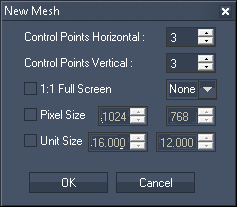 When creating a new file, this dialog box opens up. Please note that this will close your current project. (In case you simply like to add another mesh, click the Add Button next to the mesh selection drop-down list.) Decide how many horizontal and vertical FFD control points should be applied. How many to choose depends on the shape of the screen you need to warp. For more details, there is a tutorial at the end of the Warper chapter. Tick the check box [1:1 Full Screen Start Size] if the new mesh should cover the complete output instead of keeping a small border uncovered. You may as well decide what aspect ratio the new fullscreen grid will have. The width of 16 generic units will always cover the current output screen's width. If you decide for a pixel size please note that it will generate values relative to your local output resolution and aspect ratio and will apply them to the object. For example: if you are working on a 1920x1080px display and choose a 1024x768px mesh, the new plane will have a width of 8.533 generic units (16GU * 1024/1920) and a height of 6.4 GU (9GU * 768/1080). |
 Again, this option will close your current project. Choosing "Dual / Triple / Quad" will generate two / three / four new meshes (on the screen that is set to be the primary monitor). There is a UV Map covering all meshes. The settings offered in the dialog box are the same as explained in the previous paragraph. |
LOAD SETTINGS
If you want to load an existing warping file (WRP), choose the directory and file name in the opening dialog .
SAVE SETTINGS
Choose the directory and file name in the saving dialog to save your warping file (WRP). In contrast to an exported X file object, the warping file includes all internal settings like FFD points, the Mask and all other Warper settings. It is recommended to always save in this format as well.
LOAD LAST SETTINGS
Check this option to load the last project as soon as the Warper is started.
This command allows to import an object from another 3D modeling program. A pop-up asks whether you want to merge the imported object, i.e. include it into your current setup. If "No" is chosen your current project file closes and a new project is opened containing nothing but the imported 3D object.
Choose the directory and file name in the opening dialog. The following formats are supported:
- 3DS
- FBX
- OBJ
- X
The next dialog asks you whether you would like to load the 3D scene of the chosen file in separate parts or as one united object. In case your scene has more than 32 individual objects, it is not recommended to load them as separate elements as this consumes much memory.
If your object is larger than 16 generic units a pop-up lets you rescale the object. Though, due to possible rounding errors, it is recommended to scale the object in the software it was originally created with.
Please note that X files can be written by many exporters and sometimes the same data is written differently. The build-in importer is optimized to work with the exporters provided by us. Importing files from other exporters could result in changed orientations, normals,... .
EXPORT ALL
Use this export option to export all meshes as one X file.
For example, if you have created two meshes and use the "Export All" option the resulting X file will behave as follows. Both meshes are covered with the same texture. If applied to a layer in Pandoras Box its media will be displayed twice, according to the scaling and the position of the two meshes. If applied to an output layer, everything that is seen by the camera layer will again, be displayed twice.
Choose the directory and file name in the saving dialog to save all meshes as one scene.
EXPORT SELECTED
Use this export option to export only the selected mesh as an X file.
In contrast to the above option you may now export each mesh individually and apply it to different Video Layers or different Output Layers.
Choose the directory and individual file name in the saving dialog to save only the selected mesh.
Please note: Changes done to the UV texture mapping (by editing the texture's Zoom or Offset settings in the Mesh tab) will be included in the exported file. This will influence the size or position of a texture used with this object in Pandoras Box as well! If you want to have the whole texture mapped on the object, please use the option "Export Selected (1:1 UV)" instead.
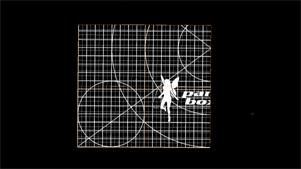
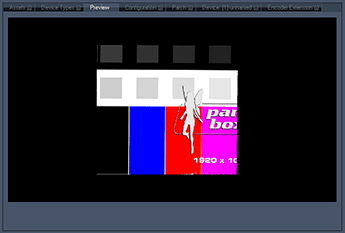
Example: The left image below shows a mesh in the Warper. The texture mapping has been modified to see only a part of the testpattern. After having exported this file via the option "Export Selected", in Pandoras Box (depicted in the right image) the object's texture will look corresponding to texture in the Warper.
EXPORT SELECTED MESH (1:1 UV)
Use this export option to export the selected mesh as an X file without the changes done in the Mesh tab.
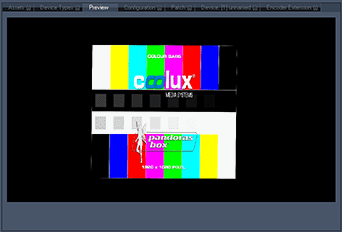
In contrast to the above option any texture's Zoom or Offset settings will not be included in the exported file - the UV map is applied with the original 1:1 setting. When the mesh is applied to a Video or Output Layer (depicted right) the object's texture will look different to the texture in the Warper (shown left).

EXPORT SELECTED AS INDEX OBJECT
Use this export option to export the selected mesh as an index object (X file) to be used for morphing or live warping within Pandoras Box.
Choose the directory and file name in the saving dialog to save the index object. In Pandoras Box, the index object can be used as any other object on a Video or Output Layer. Please refer to this chapter to learn more about morphing and live warping.
Please note that a new index file must be exported each time when the FFD and mesh count is changed.
If you would like convert an external X file to an index object please use the option "Convert .x File to Index Object".
EXPORT SELECTED AS MORPH TARGET
Use this export option to export the selected mesh or 3D object and its current look as a morph target (X file) to be used for morphing within Pandoras Box.
Choose the directory and file name in the saving dialog to save the morph state. Then you may alter the mesh / object deformation and save this as a new morph target. In Pandoras Box, the morph objects can be used as effect media files for various morph effects. Please refer to this chapter to learn more about morphing and live warping.
Please note that a mesh / object used for morphing should not be placed outside the area that reaches from -32 to +32 generic units.
If you would like to convert an external X file to a morph target, please use the option "Convert .x File to Morph Target".
EXPORT ALL OBJECTS AS SINGLE FILES
Use this export option to save each 3D objects from your scene as individual X files. Choose the directory and folder name in the saving dialog. Automatically, the files are named with a consecutive name like "3ds Obj1.x" and "3ds Obj2.x".
Use this option to export the screen mask you created in the ScreenMask tab.
Choose the directory and file name in the saving dialog to save the mask as a PNG file, which can be inserted in your Pandoras Box project and used as a mask object on a layer. Read more...
CONVERT .X FILE TO INDEX OBJECT
CONVERT .X FILE TO MORPH TARGET
The above described options "Export Selected as Index Object" and "... as Morph Target" refer to an object made within the Warper. If you have exported your object from another third party program as an X file and you would like to use it for morphing and live warping within Pandoras Box please use the "Convert..." option.
First, choose the directory and file name from your external X file in the opening dialog. Then, choose the directory and file name for the converted index object (or converted morph target) in the saving dialog. Please refer to this chapter to learn more about morphing and live warping.
CONVERT OBJECT SEQ TO MORPH TARGET
Some programs can export a movement from objects as an object sequence - a folder consisting of several 3DS, OBJ or X files. To convert all of them in one step to be used as a morph target, choose this option.
An opening dialog opens where you can navigate to the folder and multi-select all object files that should be converted. If needed, set a resizing factor. A progress bar is shown in the right upper corner of the menu. Each object is converted to a PNG file, the new name consists of a consecutive number followed by the original name. The image files are automatically saved in the same folder.
As a next step you might copy those images into a new folder that can be used as an image sequence in Pandoras Box, for example on the Aeon Effect "Warp Target" in the folder "Warp" or "Morph A-B-C" in the folder "Geometry". In order to save performance, you may convert the PNG files as well into an AVI video file, e.g. using the Image Converter tool or to a lossless video format from the coolux codec.
BATCH CONVERT OBJECT TO .X FILE
Some programs can export a movement from objects as an object sequence - a folder consisting of several 3DS, OBJ or X files. This command allows to convert all of them to X files in one step.
An opening dialog opens where you can navigate to the folder and multi-select all object files that should be converted. If needed, set a resizing factor. A progress bar is shown in the right upper corner of the menu. Each object is converted to an X file, the original name is not changed. The files are automatically saved in the same folder and can now be imported in Pandoras Box.
MERGE (WARP .X FILES)
This option enables you to merge several warping files (X files) into one file.
In the dialog, browse to the folder and select all files you want to merge. A new dialog opens asking you under what name and whereto the merged file should be saved. The merged object may now be imported in Pandoras Box or the Warper itself.
This option might be useful when you already exported separate meshes instead of using the "Export all" option.
PRIMARY / SECONDARY OUTPUT
By default the warping grid opens on your primary output.
When you have two outputs and the graphics card is in "Extended Mode" mode / "Dual View", please use this option to position the Warper's mesh on the left or right output. This is contrary to the below described graphics card setting "Horizontal Stretch".
You may open the Warper application twice whilst the first is positioned on the primary output and the second on the secondary output. This has the advantage of working on both outputs simultaneously.
MOVE TO LEFT / RIGHT OUTPUT
Choose these options if you are working with a stretched desktop consisting of more than one "display area" in order to move the warping area one step further.
STRETCH LEFT / RIGHT
When you have two outputs and the graphics card is in "Horizontal Stretch" mode (recommended display mode for soft edge projection), please use this option to position the Warper's mesh on the left or right half. This is contrary to the above described graphics card setting "Extended Mode" mode / "Dual View".
This command is useful when having three or four outputs. Open the Warper application and send it to Quad Output 1, then open the Warper 3 more times and send each to another quarter of your screen. Now you may work on all meshes simultaneously.
Alternatively you may open the Warper only once and work on several meshes using the New... command as described above.
Minimize
Minimizes the Warper window. As the Toolbox always stays in the foreground you have to close it as well or just press [H] to hide it.
Exit
Quits the application. A dialog box will appear and ask you if you want to save the project before closing. Choose [Yes] to save it, [No] for exiting without saving or [Cancel] to get back to the application.