Loading...
This topic explains how to add new content files to a new or existing Pandoras Box project and how to program it on the timeline. As the Pandoras Box Manager takes care of the show control and content spreading, you only need to add content to this machine.
In most cases, new content files are saved on an external disk. Alternatively, you can copy them via the network. The topic "File access on remote systems" explains how this can be achieved.
After having scanned the new content, please copy all files to the local hard drive of the Pandoras Box Manager. If you have used files straight from on a removable disk they would not be accessible for Pandoras Box once the disk is detached. Further, accessing files on an external disk like a USB stick or network storage device (NAS) needs more time than rendering it from the hard disk. That will lead to poor performance of Pandoras Box.
There are two recommended file locations for content on Pandoras Box systems. If you are not starting with a fresh project and want to find out where existing content is located, please see the below paragraph "Updating Content in an Existing Project".
1. Create a new folder directly under C:/Christie/content with any name that helps you identify the content. This is especially great for content that will be used in several projects.
2. Create a new Pandoras Box project first and save it. PB will create an empty "Assets" folder in your project path. The default path is: C:/Christie/content/projects/<YourProjectName>/Assets
This folder is a little easier to navigate to in Pandoras Box as there is a direct link to it. It is also useful when you need to copy the project to another system and play it there or if you want to make full backups. As the Assets folder is in the same folder as the project is, only one location needs to be stored and content links do not need to be adjusted to a possibly new folder structure.
Once the new content is stored on the local hard drive, you can add it to a Pandoras Box project. If you have not started Pandoras Box yet, please do so. See "Installing PB" or "Starting PB (automatically)" for more information.
This is the screen you start with. What you see is the Pandoras Box Manager software with the "Startup" dialog. Please click on "New Project".
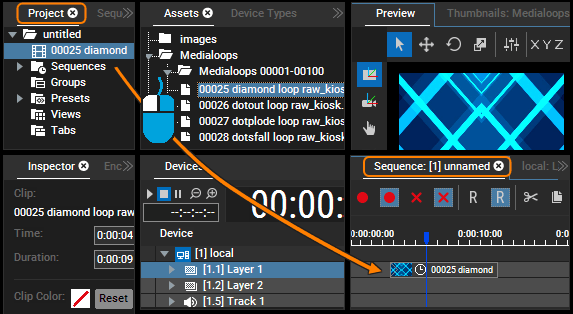
To add new content, go to the "Assets tab". Open the top folder "local" and navigate to the folder where you saved your content. If that is the "Assets" folder mentioned above, just click on "Project Assets".
Now drag your content into the top folder of the "Project" tab. You can drag entire folders or single files. To refresh the Assets tree, right-click a folder and choose "Refresh Drive".
If you prefer to work with thumbnails, you can open the "Thumbnails" tab (in the default view, it lies next to the "Preview") instead.

Pandoras Box has now saved the file link to the content location in its project data. If you delete the content, Pandoras Box cannot access it anymore and the content will be shown with a red exclamation mark when Pandoras Box tries to load it.
The chapter "Content" includes information which content formats are supported by Pandoras Box. For more detailed information about the individual tabs, see the following chapters: Assets, Thumbnails and Project which also explains the options from its context menu, e.g. adding Text Inputs or creating sub folders to organize your files, .
In order to add content to the timeline, look for the "Devices" tab, also called Device Tree. In a fresh project you will see there your "local" system with a couple Layers, the first one being a Video Layer. Drag the content onto the Video Layer Track from the "Sequence" tab as depicted below. Click into the time bar (above the tracks) to place the so called "Nowpointer" to see your content in the "Preview" tab. Hit the space bar on the keyboard to toggle the play mode of the timeline.
You can work with the Thumbnails tab here too. Select the top folder in the Project tab and the Thumbnail tab will display its content. Drag a thumbnail to the timeline as done above.

The topic "Adding and Connecting Clients" explains how other Clients can be added to the Device Tree from the Assets tab for live programming or from the Device Types tab for pre-programming of a show. In that case you would drag the content on a layer of that "Site" of course. If your Client does not show the content on its output, check the topic "Spreading Content".
The next chapter explains how to program opacity fades and shows other essential tabs of the user interface. For more detailed information about the individual tabs mentioned so far, see the following chapters: Devices and Sequence.
 If you are adding new content, drag it from the Assets tab to the Project tab as described above. Dragging content from there onto an existing container in the Sequence will replace its content but keep all other parameters. If the new clip has a different length, you should adopt the clip container to the new media duration. Right-click it and choose "Adopt Main Media". When overwriting existing content, there are a few more things to take care of. First of all, make sure, that Pandoras Box does not use the content that needs to be overwritten. The safest option is to close the Manager and reopen it when the file transfer has finished. When loading a project all content is checked and new content is automatically loaded. |
Any time when you make important changes to you project, remember to save it. To do that, click "File" > "Save project". The chapter "File Menu" explains the other saving methods you find there.