This topic introduces more important tabs from the Pandoras Box User Interface and explains how to continue programming with the timeline.
Please read the previous chapter first which explains how content can be added to the project and timeline and introduces the tabs: Assets, Project, Device Tree, Sequence, Thumbnails. Let's round up the introduction of the User Interface.
Programming on the Timeline
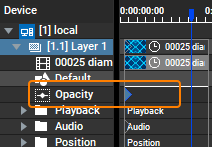
We start with our clip container in the Sequence tab. The blue Nowpointer should be positioned in the container so that you see the content in the Preview.
Double-click the container (or the Layer it belongs to) to see more parameters. Note that the Opacity parameter holds a key. Select it and have a look in the Inspector which shows, that the stored valued of that key is "255" which means 100% opacity.
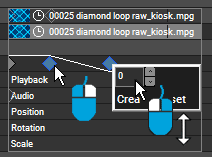
Now, make a right-click next to the existing key. This creates a new key.
To change its value, right-click it again to access its parameter handle. Left-click into the number field and drag it up or down to change the value. Or, double-click the numbers and enter a new value.
You can also select a key with a left click and change its value in the already mentioned Key Inspector. Once, the value is changed you will notice that the line that connects two keys adopts to the new value. The line shows the parameter value behavior over time.
You have just created a fade-out. With the shortcut [Ctrl + right or left arrow], you can position the Nowpointer at a certain key (including the clip borders) and by pressing the space bar on your keyboard you could play the timeline to watch the fade out in the Preview.
There is another technique to store container and keys. It is based on so called "Active Values" and uses the Device Control tab. Per default, that is the tab next to the Sequence. Most operators work with both workflows depending on the situation.
In short: you adjust all parameters including Opacity, Position, Scaling, added Effects etc. with those controls and then store them at a certain time in the Sequence with the "Store Active" command.
As we have seen above, selecting a key shows more key-relevant options and information in the Inspector tab. The "Inspector" is a very dynamic tab as its content varies depending on the last selected object. You can for example also click on a content file in the Project tab or container in the Sequence tab or Layer in the Device Tree and the Inspector will always adopt. The chapter "Inspector" includes all Inspector variations and explains their options.
Another essential tab is the "Configuration". Per default, it lies next to the Preview. It is split into various sections, which are all explained in the chapter "Configuration". Let's do one change here. Assume you wanted to program many clips and all of them should fade in and out. To save programming time, Pandoras Box offers that as a default, so called "initial" setting. Go to the section "Sequence" (second from top), scroll down and look for "Initial Values". Set the "Opacity" drop-down to "Fade In and Out" and drag another content file from the Project tab onto the timeline. The new container will be created with two opacity fades.
Toggling the Preview to Full Screen
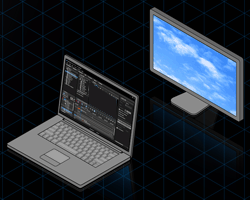
The Preview tab lets you preview your programming from the local or other remote systems. The chapter "Preview" has many sub chapters and describes in full detail what you can do in the tab. For the beginning, lets look at the difference from the Preview in the Manager-only and Manager-Client setup. The scenarios are shown in the topic "What's a Manager and a Client?".
In the Manager-Only or Standalone mode, your local system runs with a license for one or multiple outputs. Outputs of course should render in full screen. First, lets add the Outputs as layers to the Device Tree. Right-click the "local" Site and choose "Add Device > Output". To toggle the Output to fullscreen, click the top right button () in the Preview tab or use the shortcut [Ctrl + F]. As explained in the chapter "Output Setup" the Configuration tab > Render Engine lets you choose which displays are used for full screen. Hence, you can setup to see the user interface (excluding the Preview) on one display whilst the other(s) render(s) the content.
In a Manager-Client setup the fullscreen rendering is done by the Clients. To see their programming in the Preview of the Manager, right-click the site in the Device Tree and say "Toggle Preview" (you can also tell the Client to "Enter Full Screen" or "Leave Full Screen" here). Then in the Preview, set the upper right drop-down list to an output of this site.
For previewing content or for warping purposes it might be necessary to toggle the Preview to full screen. Click the button on the bottom left of the Preview or the shortcut [Ctrl + Shift + F] to do so. Note that this is still the Preview with all its editing modes. Again, you can choose which display is used for this in the Configuration tab > Local Preview.
Changing the User Interface
So far the "Getting Started" topics introduced you to all essential tabs of the user interface. But there are many more. The chapter "User Interface - Manager" includes a Tabs Overview that explain all of them. If you are rather interested in learning how to change the layout of the interface, please see the topic "Layout". The chapter "Views" describe how the layout can be stored and recalled. You might have noticed the View bar already. So far we worked with in the "Essential" view. You can click on the other ones to change the tabs and their arrangement in the Pandoras Box user interface.


 In the Manager-Only or Standalone mode, your local system runs with a license for one or multiple outputs. Outputs of course should render in full screen. First, lets add the Outputs as layers to the Device Tree. Right-click the "local" Site and choose "Add Device > Output". To toggle the Output to fullscreen, click the
  ) in the Preview tab or use the shortcut [Ctrl + F]. As explained in the chapter "
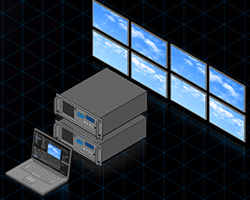 In a Manager-Client setup the fullscreen rendering is done by the Clients. To see their programming in the Preview of the Manager, right-click the site in the Device Tree and say "Toggle Preview" (you can also tell the Client to "Enter Full Screen" or "Leave Full Screen" here). Then in the Preview, set the upper right drop-down list to an output of this site.
 button on the bottom left of the Preview