Loading...
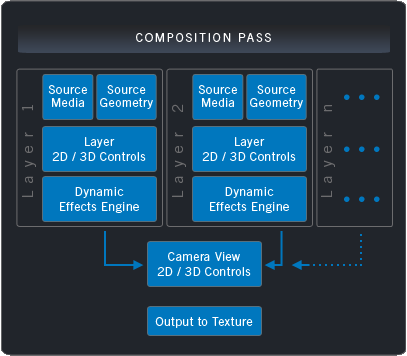
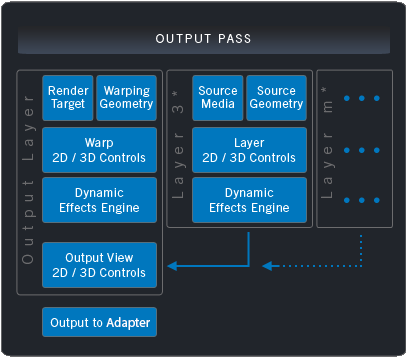
This chapter explains the fundamental video processing pipeline in Pandoras Box. It is separated in two render passes
- the (layer) composition pass, most important for the creation process
- the output pass, most important for the technical setup
 By default, all Video, Pointer, Light and Notch Layers are part of the Composition Pass. Here, you do your layer composition - setting the media, the video playback, position, rotation and scale parameters as well as the visual effects. The render history is determined by the Z Position respectively, if it is not set, by the layer arrangement whereas the topmost layer in the Device Tree tab is rendered first and thus overlaid by other layers. (For even more options see Camera Inspector > "Determine layer render order") The end of the Composition Pass is determined by adjusting the camera's perspective (see Camera Layer) onto your 3D composition. Then the "Output to Texture" process generates a so called render target. There is a render target for each camera in the Device Tree. The final texture, the render target, can be forwarded in various ways. In most cases it is simply processed by the next Output pass. This is the case when the Camera Layer is linked to an Output Layer and its render state says "Render". Further it is forwarded: |
 Camera setup |
|
 Render Target 1 |
 Render Target 2 |
 Here, you match the texture to your technical setup. In the output pass, the controls of the Output Layer allow to set up: As said above, the Layer Inspector offers Render settings which allow to send a Layer directly to the Output Pass. In the left image, such a Layer is marked with a star (*). In that case, a layer is not part of the Render Target and not influenced by warp, softedge, keystone and FX settings. Only the perspective settings (named "Output View Controls" in the left image) apply. In short, the feature allows to place Layers outside the warp or softedge area. At the end of the output pass, the "Output to Adapter" process forwards a texture to the so called back buffer respectively to the graphics card and thus your connected display. |
 for output 1, a warp object has been applied and softedge settings were used |
 for output 2, keystone and softedge settings were used |

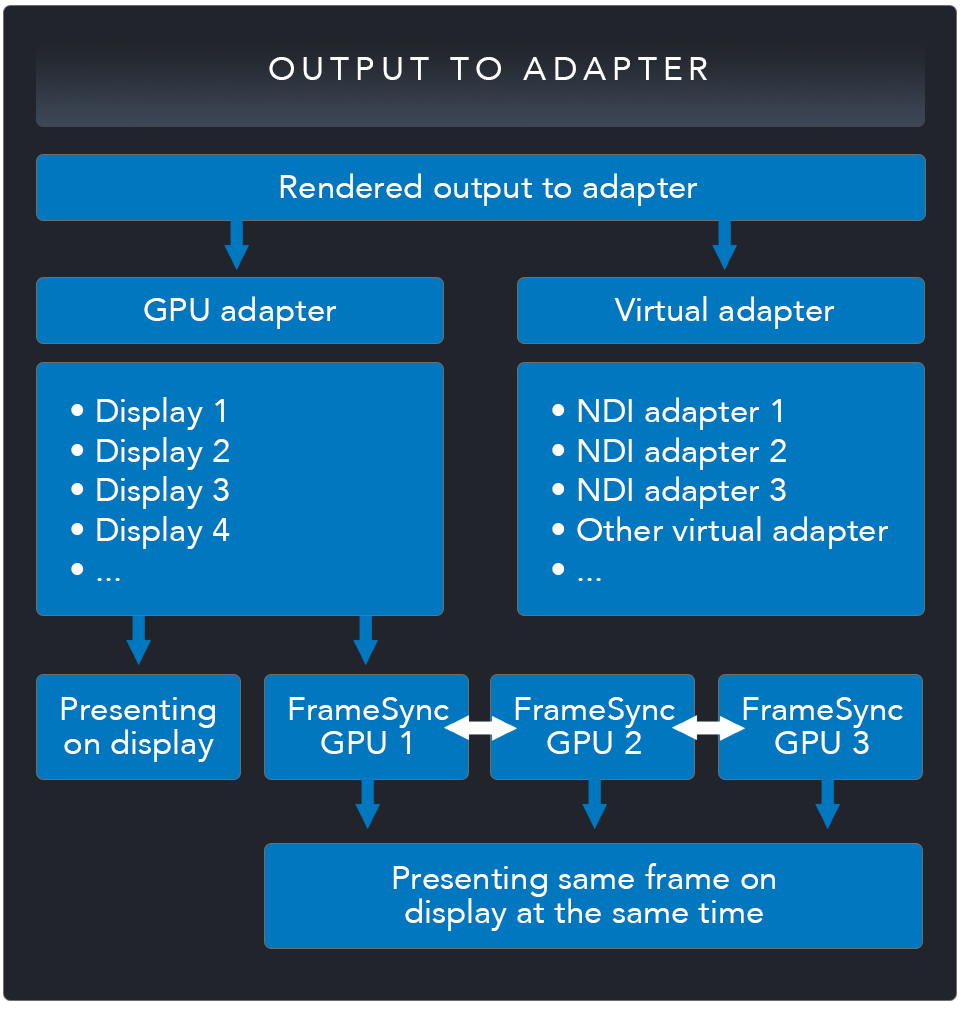
You can assign multiple adapters to each Pandoras Box output, both physical GPU adapters as well as virtual adapters. GPU adapters can now also be used with FrameSync. To do this, the hardware must first be set up correctly. You have to connect every GPU which should play out frame synced on adapters to the NVIDIA Sync Card. If you decide to use FrameSync, we recommend operating all adapters in Mosaic mode. If you use dual GPU, both have to be connected to the NVIDIA Sync Card. In addition, it is possible to use FrameSync across computers (for setting up, see Setting up Frame Lock). On all frame-synced GPUs, the same frames are shown on the display at the same time. If you use FrameSync, the maximum performance of the individual device is unfortunately somewhat reduced.
Since the introduction of virtual adapters, not only can real displays be assigned to one output, but also, for example, an NDI adapter that creates a network stream of the output. This stream is available on all active network adapters and can be played back with external NDI-capable devices. Pandoras Box also offers the possibility to input an NDI stream.