Loading...
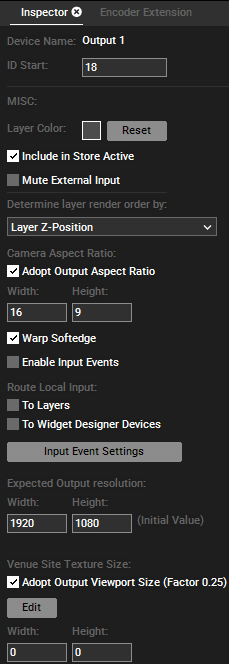
The Output Inspector opens when an Output Layer is selected in the Device Tree.

Layer Color
Per default each Layer in the Sequence tab is displayed in gray. Clicking into the gray field opens a color dialog where you can choose a different color. Note that you can also color a container.
Include in Store Active
Uncheck this option to exclude the Layer from all Store Active commands.
Mute External Input
Tick this check box to block this Layer from any external input, like Art-Net, Input Data from Widget Designer etc.
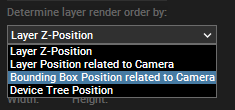
 This option is of interest when a Layer is not (only) part of the Composition Pass but (also) the Output Pass, which can be set up in the Layer Inspector. See also the chapter Video Processing Pipeline for more information. The render order for Layers is defined by their Z-position. This means, that the Layer with the smallest Z-position is rendered first. Under circumstances, e.g. when you program different or moving positions for the Output, it is necessary to change the render order. Simply choose the desired mode from the drop-down list and the current view is re-rendered. Note that "camera" refers to the Output (because it has an internal camera too) and not the Camera Layer. |
Camera Aspect Ratio
Per default, the aspect ratio adopts to the ratio set up with the width and height settings either further down or shown in the Configuration tab > Render Engine which again accords to the (Client's) graphics card settings. If the Client is not connected yet, the fields show "expected resolutions" which you can alter.
If you would like to detach this, first untick the check box and enter then enter the new width and height. The chapter Warping Tutorial shows an example when this is helpful for the Camera.
Note that "camera" refers to the Output (because it has an internal camera too) and not the Camera Layer.
Warp Softedge
Per default, Softedge settings are also influenced by the Keystone and Mesh parameters from the Output Layer. Uncheck this option if the softedge blending should not be warped.
Note that you can access this functionality with the "Warped" check box in the Output Device parameters too. Enable Input Events
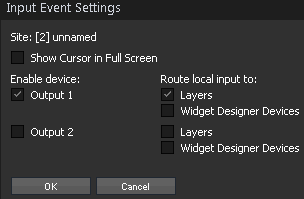
Tick the check box to enable the feature "Layer Picking". This activates the respective Output in the "Input Event Settings" dialog so that it receives mouse or touch input events. The dialog can be opened with the same-named button further down or in the Site Inspector.
Route Local Input
Please activate the above check box "Enable Input Events" first, to enable the feature "Layer Picking". Now you can route the input events to either a Widget Designer Device and, or to the layers. This activates the respective check boxes in the "Input Event Settings" dialog which can be opened with the same-named button further down or in the Site Inspector.
 Input Events Settings To see the Input Event Settings for all systems in the Device Tree combined in one dialog, right-click in the Preview tab and choose "Show Input Events" there. |
Expected Output resolution
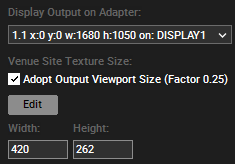
This part is only shown in case your Client is not connected yet, otherwise it is replaced with the below option "Display Output on Adapter". It displays the expected resolution for the Width and Height. You can alter the initial value, for example if you know which resolution your Client will have and your show pre-programming depends on the resolution. The same options are shown in the Configuration tab > Render Engine.

Venue Site Texture Size
The main purpose of a Venue Site is to render content from other Clients, which means that their Camera and Output textures are routed to the Venue Site. Therefore, all those clients must be toggled into the Preview. For larger projects you might want to visualize many outputs which requires the Manager to render many textures. To save performance, the routed textures are scaled down. Per default the "Venue Texture Size Factor" is set to 0.25 in the Configuration tab > Local Preview. Increase it for higher quality and decrease it for more performance.
The "Edit" button opens the Configuration tab to change the default "Venue Texture Size Factor" that automatically multiplies the reported resolution and enters new numbers into the "Width" and "Height" field. If you untick the check box "Adopt..." in the Inspector you can overwrite the number fields.
Notes
Notes can also be saved in this location. For more details, see Notes in chapter File Inspector.