What's New? |


|
What's New? |
|
What's New? |
|
What's New? |
|
Loading...
This "What's New" chapter lists updates from Pandoras Box including its tools. For updates regarding Widget Designer, please go to the next chapter.
For use as a media server PB Menu 7.6.0 offers a System Optimization Wizard. This wizard helps organize the system for use as a media server by automatically adjusting various settings. For detailed information, see the section System Optimization Wizard. |
With the new PB Menu 7.6.0 release, access the Mystique and Conductor software using the corresponding shortcut buttons on the PB Menu front page on a device that has an installed version of the software. |
If the system supports 10bit color depth for the graphic card outputs, the PB Menu creates the gradient and grayscale test pattern with 10bit color depth. |
Adjust the Windows setting "User Account Control" (UAC) using the PB Menu. This setting is used to determine whether the launch of applications must be confirmed or not. |
Users can choose to display or hide the PB Menu while showing test patterns by checking the "Show Menu" option. |
Turn on or off auto Windows user login. When activated, entering credentials is not required to log into Windows when the computer is started. |
 |
 |
 |
 |
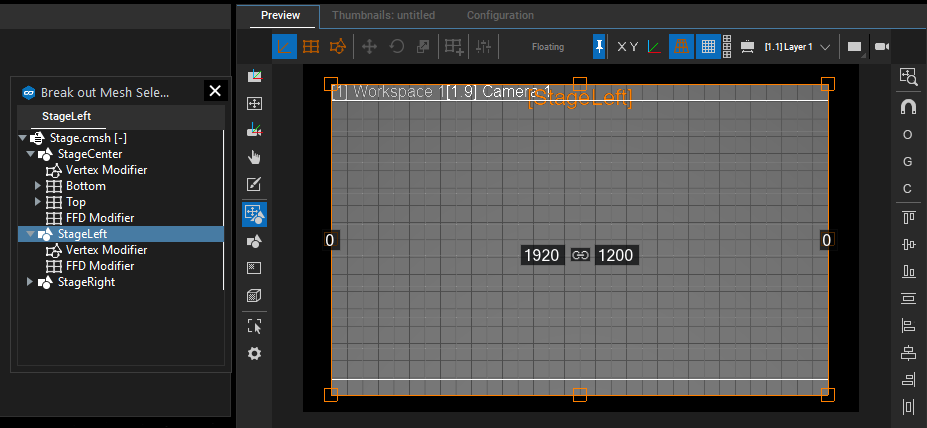
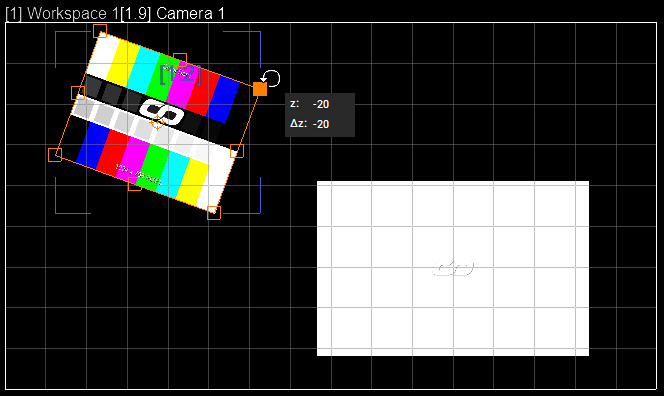
During Move, Rotate, or Scale, an asset in 2D Mesh Editing Mode or Workspace Mode a tooltip with the absolute and relative values for this transition is shown. From now on you can edit these values directly inside the tooltip. |
Snapping to Objects, Grids, Camera, or Workspace frustum and several alignment functions are now sorted into a separate button bar. |
Due to the new 2D editing functions, the option to set the mesh origin in the upper left corner has been removed. |
Now you can store active values to the beginning of the container through SDK. |
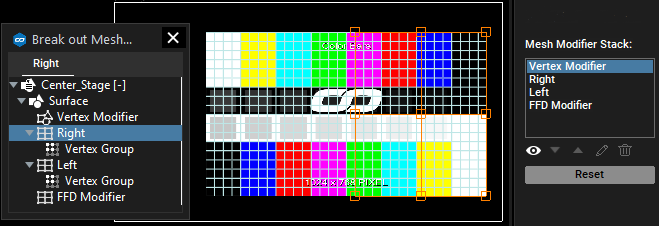
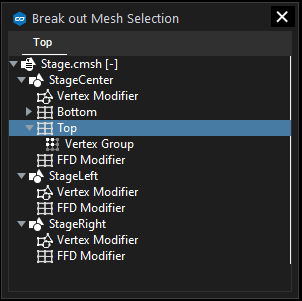
There are many Multi-User Mesh editing improvements and more. For further details view the "changelog.txt" file in the installation folder under C:\Program Files\Christie\Pandoras Box... |
This release fixes some NotchLC and automation command bugs. New automation command is added to create command keys for WD device, serial and TCP link. As always, bug fixes can be tracked in the "changelog.txt" file in the installation folder under C:\Program Files\Christie\Pandoras Box... |
|
|
|
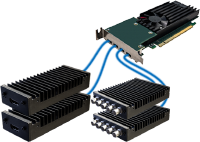
Pandoras Box now supports a new Dante PCle card. This allows an extremely large number of audio signals to be transmitted through the Dante network. Up to 512 bi-directional channels can be used. |
|
When you activate Freefun mode for a container, Transport mode is automatically switched to "Play Loop". |
|
In Workspace mode, the distance of the selected layer to the closest layer is shown. This value can also be changed by entering a number. |
In the Sequence Undo Tab, you can find up to the last 20 Sequence actions listed. |
|
Workspaces is a new mode for the Preview. It limits the workspaces preview to 2D, which means it limits all parameters in depth, for example Z position or X/Y rotation. On the plus side, selected layers display their distance to the workspace outline. You can turn on snapping to other layers, and/or cameras, and/or grid. The grid can also be defined in the workspace settings. For example, you can use it to fit your LED module size or common points of interest in your setup. |
|
|
|
|
- Select All (From Here to Current Time): This selects everything between where you clicked in the timeline and the nowpointer's position. - Select All (From Here): This selects everything between where you clicked in the timeline and the end of the timeline. |
If there is a virtual Site with a mixture of frame-synced and non frame-synced Sites, the color of the metronome turns red. |
|
In order not to change temporal relationships between containers, several containers can now be combined into one group. Container groups behave like a permanent multi-selection of groups. |
For a long time, Pandoras Box has offered automatic loading of a project. From now on, an Autoplay of this project is also possible. For this purpose, a specific time or cue can be selected separately for each sequence. And you can define a delay time for starting all sequences at the same time. |
To have a better overview of the timeline, what comes next, the timeline view jumps forward after the nowpointer has passed three quarters of the visible sequence and not only at the end of the sequence. |
This release takes care of many bug fixes and smooths its overall usage. It especially offers the possibility to switch FrameSync on and off explicitly for each site. As always, bug fixes can be tracked in the "changelog.txt" file in the installation folder under C:\Program Files\Christie\Pandoras Box... |
This release fixes a lagging GUI if many objects are shown on sequence. |
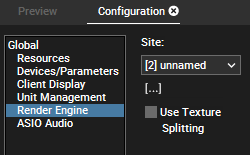
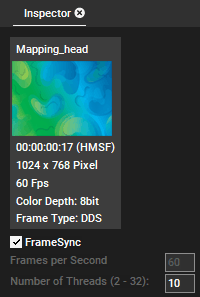 The FrameSync option can be found in the Inspector tab of an image sequence, i.e. a sequence of images in a folder (DDS, BMP, etc.) or rendered in a container (DSS / HAP in MOV). Optionally, "FrameSync" can be set when importing content via the "Import" or "Advanced Import" dialog. When FrameSync is activated, the frame rate of the image sequence adopts to the exact monitor refresh rate and Pandoras Box provides one content frame per render cycle. This means that two or more content files that were started simultaneously will always show the exact same frame number during playback. Without FrameSync, the image processing for multiple files could occasionally drift by one frame. When graphics cards from multiple systems are synchronized with an Nvidia Quadro Sync card, all displays have the same refresh rate and simultaneous image built-up, i.e. start to render a frame at the exact same moment. In those hardware setups the FrameSync feature allows for frame exact playback on all systems. Please note that it is mandatory to establish the sync timing server on a running Pandoras Box system for proper communication. Further, we recommend to work with the "Nvidia Sync Server" as this guarantees to have a single frame counter. A part of this feature is worth mentioning separately: the frame rate of an image sequence can now be changed dynamically. As long as "FrameSync" is deactivated, you can enter another "Frames per Second" number which results automatically in a different content duration. When activating the FrameSync option, the frame rate adopts to the monitor refresh rate and cannot be overwritten. Under Configuration > Resources, you can choose to which system this refers to. This is only of interest if you have synchronized Clients (with the same refresh rate) but also unsynchronized ones in the same project. |
Simple enter your URL into the address bar to view the website ("https://" is inserted automatically; "http://" or "file://" need to be entered manually). Keep in mind that it is recommended to separete the PB network from networks with direct internet access. The feature aims at using local websources, e.g. the internal Web Server from Pandoras Box or the one of Widget Designer. This allows you to create a custom interface for your PB project and by loading it with the new Web Browser tab, you can integrate it into PB's user interface. Widget Designer comes in three editions. Even the free version supports the basic functions such as buttons (with a custom script) or faders and further it allows you to host one page with its Web Server. More information and detailed examples how to connect to Widget Designer's Web Server can be found in the chapter about the Web Browser tab. |
To open the tab, please click on "Tabs" in the Toolbar and choose "Notes". Click the "Add" button and enter the note's name. Click on "Edit" to unlock the editor and enter your text. You can format it with the provided buttons or paste images from the clipboard. When you are done, click on "Finish" to save the note in the project file. As exaplained in the chapter "Notes" in more datail, you can also save notes to your hard disk or load from existing files (TXT, XML). |
and enter information in the Inspector's text field. Once you hit the Enter key, a pen icon symbolizes an existing note (except for Cues). There are three categories you can choose from: Default - white pen icon |
This release fixes some issues which arose since the previous release. This hotfix does not contain any new features. Please refer to the changelog and the previous release 8.5.0 for details on new implementations. As always, bug fixes can be tracked in the "changelog.txt" file in the installation folder under C:\Program Files\Christie\Pandoras Box ... |
Firstly, to zoom in and out the timeline has never been so easy and versatile: - The shortcut [Ctrl + 0] sets the zoom level to 100%. - As usual, you can hold the Shift key, left-click the time bar and drag it up/down or use the + and - keys on your keyboard to zoom in and out. |
Further, the Sequence Button Bar also includes a new button to toggle the "Auto Scroll" option of a Sequence which follows the Nowpointer in Play mode. Last but not least, when selecting a Clip Container in the Sequence tab, the according Layer(s) are also selected. This not only gives visual feedback what is selected but also allows to directly edit values in the Device Control tab. |
|
Therefore, Pandoras Box can be natively blended into a Christie Terra setup and PB inputs can be remote controlled via the Terra Controller which includes resolution and frame rate conversion. The Terra / SDVoE Fiber Input Card supports all different modes ranging from Genlock, Genlock Scaling, FastSwitch, MultiView and WallMode to account for any need. Audio signals can be assigned to ASIO channels to be forwarded via Dante or locally connected to a speaker. The board comes with a 10G SFP+ module and an HDMI output (as a local monitor loop output) for monitoring the incoming signal. Signals of up to 4k60 are supported and can be received as a 4:4:4 or 4:2:2 texture. The transmission format depends on the incoming signal. |
Export the Media Server block in the Notch Builder and load it in Pandoras Box; make sure that all systems that should display the content are equipped with a Notch license. Back in the Notch Builder, connect all systems that render the Notch content: Devices menu > Network Connection > Enter PB's IP addresses > Connect. From now on, all changes in the Notch Builder are sent to connected systems without the need to export or load the block manually. When you are done editing, export the final Media Server block in order to preserve the current changes. Make sure that it is spread to all respective systems. Changes to a block via Live Editing are volatile and thus need to be re-exported! It is therefore not recommended to use this volatile state during a show. The Notch feature in general is described in the chapter "Notch Layer". |
With the release of PB Menu 7.4, the password for VNC access has been limited to 8 characters and the new default password is now "Pandoras". The integrated Server Management Application comes with two updated features. You can now also install PB Menu on remote systems, in the same way as you can install Pandoras Box or Widget Designer. Secondly, you can gather log files from the PB Menu too. The PB Menu can be downloaded from our Download-Center and is described in the chapter PB Menu. |
1) When adding a Notch block to the Project tab in Pandoras Box, an icon let's you know whether the block is still loading. 2) The Notch option "Layers as separate Effects" can now be left deactivated as Pandoras Box 8.3.0 can read those blocks too. In this case, all layers in Notch are baked into one scene. The Project tab in Pandoras Box will show only one sub resource. Assign it to a Site in the Device Tree and the resulting Notch Layer will show all parameters that are exposed parameters, no matter which Layer they belong to in Notch. Accordingly, when saving the active value(s) to the timeline, you will have only one Container that combines all scenes from Notch. 3) Pandoras Box retrieves the length of individual clip containers of Notch layers as well as the maximum length of the block. After loading the Notch block to the Project tab, simply select a sub resource to see the duration in the Inspector. After assigning it to a Site in the Device Tree and saving the active values the Containers in PB automatically adopt to that duration. If the Notch block is exported with combined layers (see above), Pandoras Box retrieves the length of the resulting Container. Please use Notch Builder version 0.9.23.195 or above for this feature. 4) We completely overhauled how Notch Cameras are handled. If your scene includes an Exposed Camera (with exposed parameters) you now have the option to add a Notch Camera layer in Pandoras Box. Notch cameras can be controlled like regular PB cameras and can be stored to the timeline of course. Further, you can select a Notch camera in the Preview to interactively move through the Notch scene. More information about Notch in Pandoras Box... |
Depending on the type of board, the dialog shows other settings. Currently, DisplayPort and HDMI inputs can toggle the chroma subsampling mode whilst SDI inputs have no configurable settings. If your Client is equipped with another DirectShow board, please configure it through the Client interface. |
|
For users who have not updated to version 8 yet, this version includes important bug fixes when working with multiple text inputs, 8 channel audio files or older Particle Systems. Further, we added Softedge effects again, which were not included in the previous version. |
This release takes care of many bug fixes and smooths its overall usage. It especially removes a performance glitch which was introduced with the new blend modes and resolves the issue where a drag from the scroll bar would be carried on in the Project or Device Tree. As always, bug fixes can be tracked in the "changelog.txt" file in the installation folder under C:\Program Files\Christie\Pandoras Box ... |
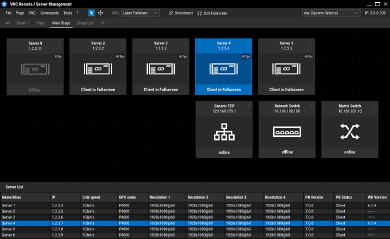
"PB Menu 7.0" has an entirely new look and overhauled clear structure. There is a new focus on security settings : We introduce a default password (PandorasBox) for the VNC connection and removed the FTP server. Further, we discontinue deprecated network protocols to better fit in larger network setups. And testpattern now include information like the IP address, Output ID and computer name. You can find a new button to start the "Server Management" which replaces the former VNC Remote. The PB Menu can be found in our Download-Center and is described in the chapter PB Menu. |
We redesigned the Server Management App and overhauled the structure of the user interface. You can now arrange devices on separate pages and their properties (resolution, frame rate, version and status of PB and WD, etc.) are displayed permanently in a table in the lower part of the UI. Of course, you can still easily connect via VNC to appropriate remote systems, however we added a password for security reasons ("PandorasBox", see PB Menu > Settings > VNC Server). The Server Management can be found in our Download-Center and is described in the chapter Server Management Application. |
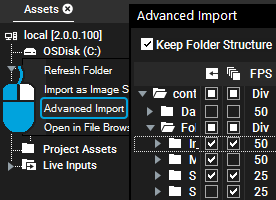
In the Assets tab, simply right-click the main folder with all your content and choose "Advanced Import". A dialog opens, analyzes the content and shows all sub folders. Click the first check box "Import" for each folder you would like to import. A second option allows to import the folder as an image sequence or as normal images. Further, you can set the frame rate, threads, and naming option. All changes apply automatically to containing sub folders but can be individualized if necessary. Read more about this feature and its settings in the chapter "Assets" > Advanced Import. |
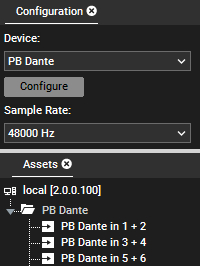
To input Dante streams, first open the Configuration tab and choose the ASIO Audio tab from the new "Sites" category. Select the Site that should be receiving the stream. Then, go to the Assets tab and open the folder "Live Inputs > PB Dante" and choose a Dante stereo input from the PB system with the Dante device drag it into the Project tab. Per default, you will see 32 inputs (16 stereo channels). If you have entered less channels, only the according inputs will be active. If you have chosen more channels, you might need to refresh the list to see more inputs. As demanded by Dante, you need a Dante Leader in the network used for transmitting Dante. The Dante Leader unlocks the Dante functionality per se, generates a clock and syncs the signals. The Dante Leader can be any Dante interface or Dante audio card for example. The "Dante Controller" software can be used to assign the Leader functionality, route signals, match sample rates for sources and outputs, etc. For using more than 32 channels, we recommend to separate the network traffic from the show network and use a dedicated Dante card. The Dante card offered by Christie allows to use 256 channels in total. As said above, it can be a Dante Leader. |
|
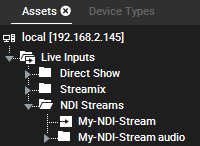
Of course, all PB systems need to be able to receive the stream directly from your NDI device, mobile app, software application etc. Keep in mind that Pandoras Box just receives the stream, it is not transmitting it to others. Furthermore, a constant resolution for NDI streams is not required anymore. This allows using applications where the stream's resolution changes dynamically, e.g. due to network issues. The Inspector now offers "Texture Width" and "Height" fields for NDI streams. When adding an NDI stream to a PB project, the texture size adopts to the initial incoming resolution and stays even if the resolution changes later. The texture size adopts only, if the "Reload" button is clicked, or if other values are entered manually. NDI® is a registered trademark of NewTek, Inc. For more information about NDI itself, NDI tools etc., see http://ndi.tv/ |
|
The power of the Server license is now combined with the Manager features. The new license allows 3D rendering, playback beyond 4K and support of 10bit color depth whilst offering unlimited sequences, layers and effects. In addition, this license can run on any hardware system, custom hardware included. In other words, features previously only available with hardware/software combinations now become accessible to everyone. What's been previously known as the "Manager" (or alternatively the Manager mode of a Server or Player license) is now the "Manager" mode of the new license. To add a Client to it, start a second license in "Client" mode on another system. The Manager has two configurations: when running it without Output Layers, it can start a Multi-User session or join one. If you on the other hand add Output Layers, you can use your Output(s) in fullscreen mode. Multiple licenses can be stacked by combining dongles or they can be applied to a single dongle. The number of licenses is linked to the available number of Output Layers which can be linked with any Camera Layer. If your Site in a project contains four Output Layers, it can only manifest on a PB system with four licenses. If it holds only three, a dialog offers to remove one Output Layer. Further, we worked on the Layer Structure. As everybody has now access to unlimited Video Layers, we removed Graphics and Text Layers. As described below, there is a new layer type: the Notch Layer. |
In the Notch Builder you first design your scene and then decide which parameters should be exposed in the so called Notch block that will be loaded in Pandoras Box. The exposed parameters can be everything from text, amount, color, to size or position etc. If you program items to the Notch timeline, they will be synchronized to the PB timeline when storing them as a container. In Pandoras Box, you first select the Notch block, the dfxdll file, in the Assets tab and drag it into the Project tab. The first loading process takes some time. Depending on your Notch composition this can be a few seconds or even minutes when using many textures etc. When finished loading, you can open the Notch entry in the Project tab and see its sub elements which are the layers in Notch. Now, simply drag one on a Site in the Device Tree to add a Notch Layer to it, this is a new layer type. This Site needs to be equipped with a Notch license to be able to render the content. The "Media" parameter of the new Notch Layer becomes an active parameter. When you execute the "Store Active" command, you will see a new Container in the Sequence. When you play it back, this could look like a 2D video or transition or like an entire 3D scene with camera animations and particles reacting on content. Of course you can blend other content and live feeds with the Notch content. Or, go a step further and combine both by assigning PB content to an exposed Notch Media parameter. The new Blend Modes or LUT shaders that come with PB version 8 are very helpful for that as well as the new Share Layer Option, all described below. In the Device Controls tab, you will see other parameters known from a Video Layer but also dedicated Notch parameters that were exposed before using Notch. Just as with PB parameters, they can be changed and stored as key frames on the timeline. They can also be controlled from Widget Designer, e.g. through interactive devices like the AirScan or sensors like Phidgets and more. Examples can be found in the chapter "Notch Layer". As Notch renderings can demand much GPU performance, we recommend to equip the PB system with the Notch license with one of the newly offered RTX graphics cards. |
To use NDI in Pandoras Box, go to the Assets tab to open the "Live Input" folder from a PB system and you will find a new folder "NDI Streams". Once an NDI input is added to the project and assigned to a Layer, the according PB system subscribes to the stream and displays the content. Pandoras Box supports all NDI variations including different compressions (i.e. NDI and NDI HX) with a resolution of up to 4k@60 and the alpha option which needs to be activated in the Inspector. All Live Inputs are analyzed once, hence it is not recommended to change the resolution after adding the source to the project. The NDI feature is described in the chapter "Assets tab" under "... Live Inputs". NDI® is a registered trademark of NewTek, Inc. For more information about NDI itself, NDI tools etc., see http://ndi.tv/ |
To output Dante streams, open the Configuration tab and the ASIO Audio tab (from Local or Global in case you would like to stream from another system than the local one). As demanded by Dante, you need a Dante Leader in the network used for transmitting Dante. The Dante Leader unlocks the Dante functionality per se, generates a clock and syncs the signals. The Dante Leader can be any Dante interface or Dante audio card for example. The "Dante Controller" software can be used to assign the Leader functionality, route signals, match sample rates for sources and outputs, etc. Lastly, in the Configuration tab, check the number of Dante channels. Then assign an audio file or live source to an Audio Track and check the channel routing in the Track Inspector. For using more than 32 channels, we recommend to separate the network traffic from the show network and use a dedicated Dante card. The Dante card offered by Christie allows to use 256 channels in total. As said above, it can be a Dante Leader. |
To get more or different connector types, simply connect another module that offers the needed connectors. This allows to mix various connection types just as your show requires it. There is not need to open the chassis - just shut down the system (never hot plug the modules!) and changing the inputs becomes a matter of seconds. Thus, the FLEX input card is especially of interest for Rental and Staging customers or whenever changing setups are needed. The external modules can be used as floating devices or can be integrated in a 19'' rack offered by Deltacast. Find more information about the Flex card and its modules in the chapter "Flex Input Cards" or on the website from Deltacast. |
However, this loads only the texture. If there are effects on the linked layer, they only affect this one layer. For that reason, PB V8 offers a new command "Share Layer Rendering" which loads the texture of the chosen Layer and applies its effects. Right-click the Media field to find both "Share Layer" options. |
Blend modes can be found in all Layers, including Notch Layers and also Particle Layers. In older versions, particles where simply added to the background. With the new blending options, you can now create particles darker than the background and much more. All blend modes are listed and explained in the chapter "Blend Modes". |
You can find the new effects in the folder "LUT" from the Aeon FX tab. As with all effects, drag them onto a Layer and set the "Mix" to 255 to see the full effect. Each LUT effect offers a drop-down list from which you can choose an entry. In total, you have access to almost 200 look up tables. However, there is one exception. With the effect called "Custom 3D LUT Filter" you can define the effect by adding a custom image. For this, you can find examples in the Stock Assets folder under Textures > Custom 3D LUTs, they are all 16bit PNG files. Load the "neutral_LUT" file in Adobe Photoshop, apply your color correction and re-import it to Pandoras Box. |
With Pandoras Box V8 you can now save specific settings from the Configuration tab and create one or more User Profiles.
When saving the PB project, the profiles are saved in it. This includes the "Default" profile (for this single project). In addition, profiles are automatically shared with other Users when working in a Multi-User session. Note that the "Default" profile is selected per default, hence changes apply to these instances too. But of course, every User can apply an individual profile. If deleting a profile, it also disappears for other Multi-Users. PB warns you in case you are deleting a profile tat is used by another Mutli-User. The Configuration tab and Multi-User tab display which profile is used by which Multi-User. |
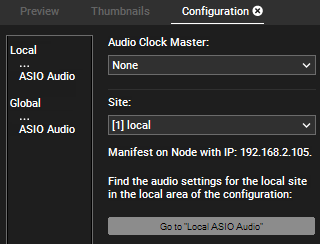
On the one hand, the setting regarding the local site can be found in the category "Local" and are also saved locally. On the other hand, the ASIO Audio settings from the "Global" category allow choosing an audio clock leader and shows ASIO audio settings for connected Pandoras Box Clients. When working with other Multi-Users, the global settings are saved within the project and therefore they are also synchronized. |
|
Performance depending on video codec but up to:4x 4K60 / 12x HD60 uncompressed, 10bit color depth 20x 4K60 / 64x HD60 compressed, 8bit color depth
Available in different performance kits:PK1: 960GB SSD / 24GB RAM PK2: 7.5 TB SSD / 48GB RAM PK3: 32TB SSD / 48GB RAM Optional graphics cards:P4000 / RTX 4000 / RTX 6000 (RTX cards are meant for Notch rendering) Up to 8 physical DisplayPort outputs from a single system Optional video input cards:12G/3G SDI, HDMI 2.0, DisplayPort 1.4 Read more... The FLEX input card or rather gateway card creates a single gateway in the system which can be connected to various boards. Read more... Optional audio input/output cards:ADAT 8ch audio Dante 128x128ch network audio |
This version includes important bug fixes when working with multiple text inputs, 8 channel audio files or older Particle Systems. Further, we added Softedge effects again, which were not included in the previous version. |
At the first glimpse, you won't notice anything new in the Preview tab or Rendering window but that's just the outside - the inside is a completely new render engine which is based on DirectX 11. We have reworked, optimized and improved the entire video rendering process from ground up. The advantages you can witness already today are a better performance and a higher color depth (see below) but the future will reveal more. |
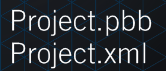
In the Configuration dialog > Render Engine you can now find the option "Back Buffer Color Depth" which can be set to 8bit, or 10bit on Servers. As this is available for each Client separately, you can save performance on those Clients which are not connected to 10bit capable displays or projectors. Christie is now offering 10bit HDR support throughout its entire product offering. |
In addition, you can make use of a new image (sequence) format called DPX (Digital Picture Exchange) which is a common format for uncompressed still frames. If you have not heard from DPX, you can think of it as a bitmap format that can be saved with more variety in color depths. Pandoras Box accepts DPX files with a color depth of 8, 10 or 12bit per channel. However, any content will always be rendered in 8 bit or 10bit, according to the render engine. This happens automatically, i.e. no re-rendering is needed. All image formats are explained in detail in the chapter "Image Formats". To sum this up: If you render images or image sequences with a color depth of 8bit there is no advantage of using DPX files over BMP files, it is just another possibility. Various QuickTime codecs containing 10bit or more are also supported. |
The export functionality has been extended and includes DPX files with 8 or 10bit color depth, with or without transparency. Thus, the new Image Converter allows to transcode 16bit PNG or TIFF files into 10bit DPX files to be efficiently used in Pandoras Box. For more information please see the Image Converter chapter. |
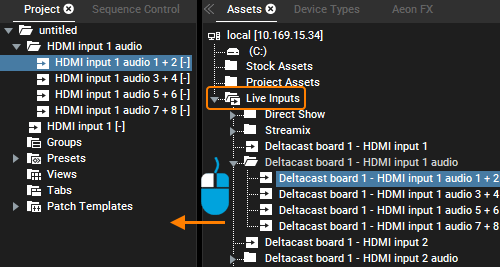
Similar to SDI audio, the new HDMI audio options are displayed in the Assets tab. Simply open the "Live Inputs" folder of the respective Client or Manager system and look for the HDMI audio entries. HDMI supports up to eight channels which are displayed as four stereo channels in the Assets tab. Select an entry and drag it to the Project tab. From there you can assign it to an Audio Track. To playback the audio part you always have to play the video part on a Video Layer simultaneously. Pandoras Box supports sample rates of 44.1k and 48k. As Inputs are not resampled please make sure that the audio device matches this sample rate (Configuration tab > ASIO Audio). The sample rate of the HDMI audio channel is displayed in the Inspector when selecting it in the Project tab. More information can be found in the chapter about the HDMI input card. |
We have seen a higher show performance when we checked this option working ... : As the name suggest, this option splits textures internally which has the effect that the system handles smaller (but more) textures instead of one very large one. As a result, the loading process of large textures gets smoother and thus increases the "show performance", which we state on our Performance Sheets found in the Download-Center. The show performance defines the maximum number of videos which can be started and stopped without interfering other videos. |
This version includes important bug fixes for issues which occurred when adding audio files with an unsupported audio format to Pandoras Box. |
To change a view to your needs, open the "Views" folder in the Project Tree, right-click the according View and choose "Update". This saves the current layout. When saving a new layout, you can now choose between two options from the right-click menu of the "Views" folder. With "Create View" you save the entire layout as usual (with a small structural change as explained further down). With "Create Partial View" you are saving only a specific part of the interface. A dialog asks which of the four sub-views should be included: When creating a View (via "Create View"), all four sub-views can be found as sub entries in the Project tree. They can be applied, updated or removed separately. The seven new default views change only the "Layout" part, so that the currently loaded Sequence, Preview and Device Tree do not change. You can add a new View to the View Bar to access it faster. You can either drag it there from the Project tab, or right-click it and choose "Add to View Bar" or make a right-click in the View Bar and choose "Add". In the View's right-click menu, you can also find the new option to "Export" a view, which saves the "Layout" sub view as a pbv file to the hard disc. |
|
|
The Pre Roll Time, which can be found in the Clip Inspector, allows to load content before the Nowpointer enters the Container which is stored in the Sequence. Per default, this time is now 2 seconds. In addition, you can find the Pre Roll option when a Live Input is stored in the Container. When importing an Image Sequence, the default frame rate is now proposed with 50 FPS. |
From now on, you can multi-select folders in the Assets tab, right-click them and choose "Import as Image Sequence". If you don't need to set up individual frame rates, set up your frame rate under Configuration > User > Resources > Image Sequence Initial Values and uncheck the option "Show Popup..." In addition, you can multi-select Sites in the Device Tree and choose "Toggle Preview". |
From now on, QuickTime files support embedded audio again. |
Starting with Pandoras Box version 6.4.1 we are supporting the original Deltacast drivers (version 6.14) which we have added to our driver package in the Download-Center. When having two or more cards in a single computer they have to run with the same driver version. Therefore, a DVI board cannot be used along with the 12G board in a single computer. Using different driver version on separate machines is not a problem. Furthermore, we have optimized the behavior of live inputs in our software, so that they only use system performance when being assigned to a layer. |
The new environment allows to address more memory so that you can load more layers with large content at a time. Further it can do more processing in parallel. This is why the overall performance increases and is especially visible when playing back various codecs. Obviously, whenever the bandwidth of your hard drive or PCIe bus is the limiting performance factor, this cannot be overcome. But especially with compressed video files (HAP, MPEG-2, etc.), the performance increases substantially on most systems. Depending on the used hardware, even uncompressed videos get a boost as more frames can be simultaneously cached in the system memory now. We will update our Performance Specs for content playback in the near future in the Download-Center. |
The QuickTime decoder that was part of the 32bit installations has been replaced with a new decoder. This not only enables you to playback more videos in parallel due to better performance, but also opens up a new world of video codecs. Pandoras Box now easily digests videos encoded with H.264, HEVC, ProRes of multiple flavors or even DNxHD. We will provide a full list of supported codecs and its performance when coming closer to the next release. In this version, embedded audio in QuickTime files is ignored and the GUI states "no audio" in the Inspector. Video performance for QuickTime based files now also benefits from hardware acceleration. Depending on your Nvidia GPU, you can hardware decode codecs such as H.264 or HEVC. You will witness a massive CPU usage drop when Pandoras Box automatically activates the hardware acceleration. You can double-check your GPU charts to verify which files can be accelerated, e.g. on https://developer.nvidia.com/video-encode-decode-gpu-support-matrix (the right side of the table). |
File and device trees (project tree, asset tree, device tree, patch tree,...) have been rebuilt to include new functionality. The tree item selection now follows Windows defaults and does not maintain selections when single-clicking on an already selected device. In the Device Tree tab, you will now find distinct columns for different information: parameter names, values and various icons are placed separated: Please activate "ClearType" to have a clearer font and, as always, make sure that the "DPI scaling" is set to 100% for a correct scaling of our interface. The chapter "User Interface - Manager" explains this in more detail. |
Also, the log files and crash dumps got a new location to prevent the need to navigate into system locked installation folders when grabbing a file for support. A bigger change is the new content folder: As introduced many years ago, Pandoras Box prefers and defaults into C:\coolux\content. Christie hardware always mounts content drives (RAIDs) into this folder to act as a regular folder and all content data is placed into the right location. This way the OS-drive is not overloaded with content or cache files. Pandoras Box 6.4.0 also finally removes all mentioning of coolux and transitions to Christie (Digital Systems Germany GmbH). This requires us to mount content drives into C:\Christie\content going forward. No worries, we do care for compatibility! You will not even realize that this has changed as we continue to use the coolux folder if it exists already. Only when installing Pandoras Box 6.4.0 on a brand-new system, the Christie folder will be created. Existing hardware can be used as it is and also a mixture of hardware configurations is no issue at all. |
Step-by-step instruction: |
The Thumbnails tab is still available but as always, you can open it only once and the displayed content changes dynamically whenever you select another folder. The File Browser on the other hand is more static as it keeps displaying the same content. |
Pandoras Box Media Encryption is a technology that encrypts media in order to protect content from being played back by unauthorized persons or systems without permission. More information... |
When working with HDMI inputs, you can now choose another chroma sub sampling, i.e. RGB 4:4.4, in addition to YUV 4:2:2. You can find this option in the configuration window from the input. Manager: add input from Assets tab to Project tab and select it; click "Configure" button at the bottom of the Inspector |
|
With this Pandoras Box version, the older Jog/Shuttle and Playback Extension are not supported anymore. Please make sure to use the newer version of the Jog/Shuttle Control (depicted below) and Fader Extension. |
MA-Net version 1 is no longer supported in Pandoras Box. MA-Net 2 (v2.9xx) and other protocols can be activated in the Configuration tab > Remote Control Protocols. |
Please make sure to have Input Card driver version 6.0.1 installed when using video inputs with Pandoras Box version 6.4.0. Older input card driver versions are no longer supported. |
The installer now includes the USB driver which you need for various Pandoras Box USB devices. |
We also updated the software "PB Menu" which is pre-installed on all Pandoras Box hardware. "PB Menu 6.4.0" reflects the changes with the new file paths for the installation of Pandoras Box as well as for the Logs and Content folders. Besides, it includes bug fixes. Please download it from the Download-Center. |
This version includes bug fixes to prevent possible crashes. Pandoras Box 6.1.4 is the last version in a 32bit environment. Following PB versions are 64bit applications. |
More information can be found in the chapter Programming in the timeline. |
|
Pandoras Box version 6.1.3 introduces the possibility to recalibrate (transform) CMSH-files from Widget Designer (version 6.1.0). You will need the Projector Recalibration tool from WD and the hardware device "Calibration Link". |
|
Touch induced mouse events now work for CEF browser as well. Up until now, touch events only worked in the Awesomium browser engine. More information can be found in the chapter Configuration > Resources(Global). |
The button "Toggle Overview" shows (or hides) a table with all Universes and Subnets. The table can also be clicked to see all channels from a respective universe. Alternatively, you can choose the universe with the drop-down list(s) on the left side. You can either choose a "Universe" and "Subnet" or a single "Universe #" in case the option "Universe As Single Number" is checked. A new drop-down list lets you select the network adapter that is used for Art-Net. If channel values cannot be received anymore (e.g. because the connection is interrupted) the displayed blue values turn gray. In that case you can erase them with the "Clear" button. Now, "---" is displayed per channel until values are received again. |
Pandoras Box version offers three optimizations regarding the outgoing Art-Net data when Sites or Layers are patched. From now on, Art-Net output values are only sent when a Channel is patched. Further, channels are reset to 0 when a patch is removed. And lastly, Art-Net universes stop sending when they are not used anymore. |
New TCP Device for simple communication to TCP/IP Server (e.g. projectors or video switchers). |
|
The playback performance of TIF image sequences equals the one for BMP or other uncompressed files. The performance specs can be found online in the Download-Center. Note that TIF sequences are only supported when the images are saved uncompressed with a color depth of 8 bit and with or without an alpha (transparency) channel. For importing TIF still images, you can also choose other TIF saving options like image or layer compression but the above recommendation gives you the best quality and performance. Note that multiple layers are discarded as the file can only be assigned to one Layer in PB, e.g. a Video Layer. Please see the chapters Image Formats and Image Sequence Formats for more information. |
|
|
The File Location Table, e.g. in the File Inspector, informs about the location and status of the selected file on each system connected to the Manager. In former versions this included only Clients, but now also Multi-User Places are listed to give you a proper overview where the file exists. |
Furthermore, it is now possible to multi-select remote Clients and drag them into the Device Tree. |
The command that stores active values only for those Devices that are currently selected, has now the shortcut [Ctrl + Alt + D]. As in previous versions, it is still available in the Edit menu or in the Sequence Button Bar via this icon |
As a reminder, you can right-click a pane and choose to split it horizontally or vertically and then drag the second Device Viewer to the new location. This is explained in the chapter "Layout". |
|
Note that you can also change the Site ID in its Inspector. |
|
|
|
|
|
The first possibility for Multi-Users is to work in a "Sync Session" where all changes are synced continuously and seamlessly between all Users. However, you can also activate the "Blind Mode" within the Sync Session for working with an independent Nowpointer and Active Values. This allows you for example to jump to "your" time in the Sequence to store content or to view content in the Preview. Alternative to (fully or partly) synchronized programming, you can work asynchronously in a separate project and send ("push") your changes at a certain time, e.g. checked or newly encoded content, warp and softedge settings, parts of a Sequence, etc. The "Run Operation" button in the Multi-User tab opens a dialog to define these Pull and Push Operations. Note also that the Configuration is newly structured. All settings that are listed in the Global category apply to all Multi-Users whilst the other ones apply only locally. |
In case you maximize the Preview to full screen (shortcut [Ctrl + Shift + F]) a new window "Button Bar" opens and shows all modes and associated tools. Its shortcut is [T] to show and hide it. See the Preview chapter for full and accurate information about all the new options or read on for a short description of the new Preview features. |
In the Output layer you may find a new "Edit Warp Mesh" button. It either selects the Output Mesh or creates a new one for you and enters the "Editable Mesh" mode. All this and more is explained in the chapter about the Mesh Editing Mode. |
The planar one probably reminds you of how you worked in the Warper. You have the choice between two differently sized planar maps and the default 1:1 map. |
Read more in the chapter about the UV Mapping Modes in the Preview... |
|
If you now click on the Camera rectangle it highlights blue and you can drag it around. This changes the X and Y Offset parameters. Cameras of a Server have more parameters available. First, click the "Camera Visibility" button to toggle the Camera icon and frustum as seen in the left picture. Now you can either drag the Camera icon around which influences the Camera Viewpoint and Target simultaneously, or you can drag the Viewpoint and Target separately. Hold the [Alt] key down to move the Camera / Viewpoint only and the [Alt] and [Shift] key for the Target. |
|
|
Independent from the number of view ports, it is possible to maximize the Preview to full screen. This is especially of interest in case you warp several Outputs in the Manager using the Editable Mesh feature. |
|
 Show/Hide hidden text


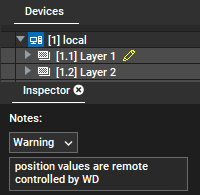 In addition to the above mentioned feature, many Inspectors now also offer a "Notes" section. Simply select
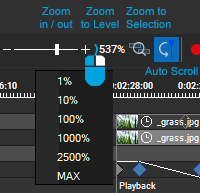


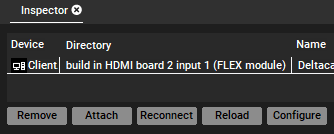 The Pandoras Box Manager can now configure Deltacast video live inputs, including all boards sold by Christie. There is no need to access the Client interface anymore in order to do so. Simply add the video input to the
 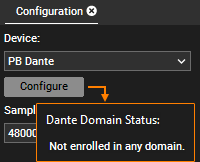 With this release Pandoras Box supports the
 With the last version we introduced our new
 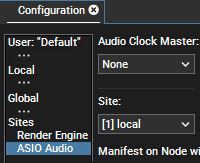 The Configuration tab has a new category "Sites" which shows settings regarding the
  Pandoras Box V8 introduced the support of
 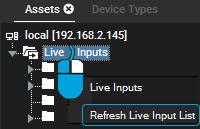 The "Live Inputs" folder in the Assets tab now also offers the option to refresh the list. This is especially of interest when receiving NDI streams as the network adapter needs some time to identify NDI sources.
 We have fundamentally simplified the license structure. It has never been so simple and yet powerful as it offers the full feature set of Pandoras Box to everyone. The "Pandoras Box Software License" replaces six products: Server, Player, Compact Player, Software Player, Manager and Educational License. Next to it, there is still the "Offline License" and Demo version. The chapter
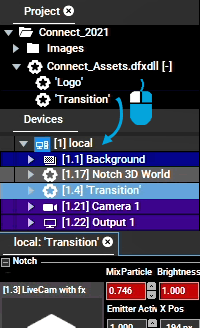
 Pandoras Box V8 features the support of multiple NDI streams including embedded audio streams.
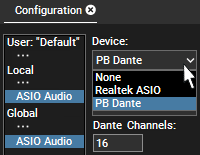
 The Flex card is a revolutionary solution for input boards. The new gateway card which is built into your hardware offers four inputs. They can be connected to various external modules which provide the connectors. There are four modules available offering SDI, DiplayPort and HDMI inputs. In total, you can input up to 16 SDI channels (12x 3G or 4x 12G) or alternatively, four 4K60 streams via DisplayPort 1.2 or HDMI 2.0, or a mixture of them.
 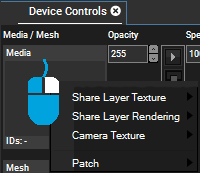 Since a long time Pandoras Box offers the command "Share Layer Texture" (previously only for Server licenses). It loads the same texture which is assigned to the linked layer and has the advantage that a video file (or any other content) does not have to be loaded several times from the hard disk. This allows a better performance and saves programming time.
 Pandoras Box now offers a total of 20 different blend modes, which allow to blend a layer in all imaginable ways with the background.
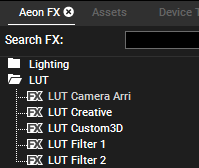 We added new effects which are based on the principle of so called
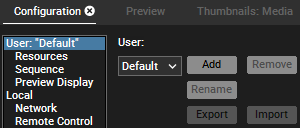
 As Pandoras Box v8 supports the same project structure and format, there are no limitations in loading older v6 projects.
 With this version, we introduce an absolute new render engine for all Pandoras Box products.
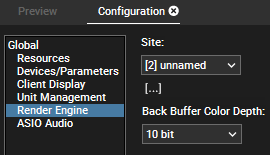
 In order to render in a higher color depth, the inserted content needs to provide it. Therefore, Pandoras Box supports now PNG and TIFF files with a color depth of 16bit per channel. The color depth information has been added to the

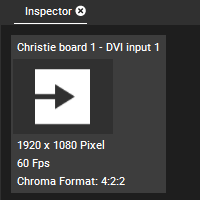 The Inspector from version 6.4.3 will now also display the chroma sub sampling for live inputs, e.g. "4:2:2". Since version 6.4.0, you can choose another chroma sub sampling, i.e. RGB 4:4.4, in addition to YUV 4:2:2 when working with
 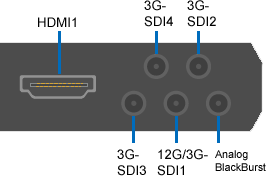 With this version we introduce a new input card. It is our first 12G input solution and comes with additional inputs to be used as a Quad 3G-SDI board. It is also equipped with an HDMI 2.0 input which can be used for DisplayPort as well. The image shows all inputs from the "12G/Quad 3G SDI, HDMI/DP" board.
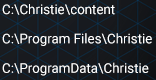 Pandoras Box is now installed into
 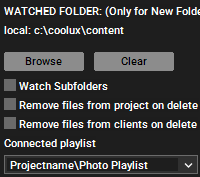 Another 6.4 feature is the functionality to directly link a
 The 64bit version of Pandoras Box uses a new encryption algorithm. Hence, media files that are encrypted with this new version can only be decrypted with another 6.4 (or higher) PB system. In return, media files encrypted earlier can only be decrypted with a PB version below 6.4.
 This version makes it easier and more intuitive to drag containers and key frames precisely to another element on the timeline.
 When dragging a container or key frame in the timeline, a new pop-up appears next to your cursor and shows the relative time how far it is moved, e.g. plus 20 frames.
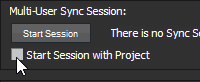 The Startup menu of Pandoras Box version 6.1.3 offers the possibility to start a project and a sync session directly. For more information about Sync Sessions, please see the chapter
 With Pandoras Box version 6.1.0 we introduce a user interface in different languages. To change it, please go to the
 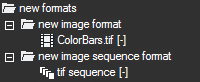 Pandoras Box version 6.1.0 supports now the TIF format for images and image sequences.
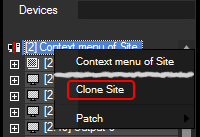 If you right-click a Site (remote Player or Server) in the
 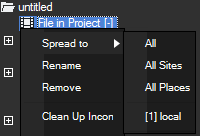 The context menu of a Resource in the Project tab offers new commands to spread the file. You can choose between these options:
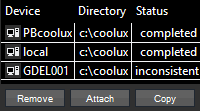 The Inspector tab in Pandoras Box 6.1 now shows other
 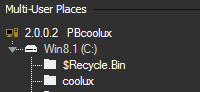 Up until now, the

 It is now possible to re-structure entire sites in the
  From now on, if you select a ghost key, all underlying keys will be selected too. Select the ghost key with a single click or by dragging a multi-selection box around one or more ghost keys. You can then drag the ghost key(s) to a new time or enter a value in the Inspector which changes all underlying keys.
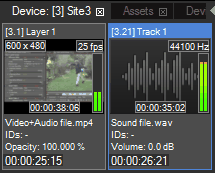 The
The 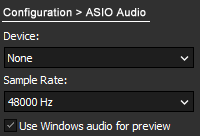 This feature is of interest if the computer that runs the Manager has no dedicated ASIO sound card or driver installed but offers a Windows audio device. In previous versions this hardware setup allowed only to play audio (containing) files on a Video Layer but not from an
 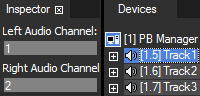 The left and right channel of an
  Pandoras Box version 6 introduces the Multi-User feature allowing several operators to work on the same Manager file loaded with a Manager license. As the ways to build shows with Pandoras Box are so versatile, Multi-User editing is a flexible feature. This means that you can choose what exactly you would like to synchronize and how often or when you would like to do so.


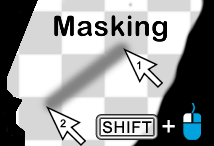 Version 6 comes with a significantly improved Canvas. It is now possible to draw directly in Pandoras Box with tools provided in the Preview tab. In addition, the Canvas Asset can be saved, exported and (re-)imported. All together the Canvas feature now also allows to mask directly in Pandoras Box.
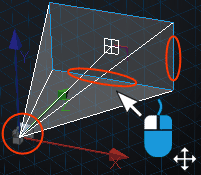 With this version you can interact with Cameras in the Preview in the same way as you are used to position Layers.
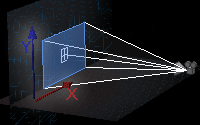 The continuous development to interact with more and more items in the Preview directly now allows to change Layers, Cameras, Mesh Points etc. To optimize this workflow and reduce errors, version 6 introduces a slightly changed interaction. Eventhough you still work with 3D parameters, each interaction happens in a 2D plane which depends on your viewpoint. This results in those changes you aimed for and prevents you from dragging items to an unwanted position, e.g. a distant Z position.
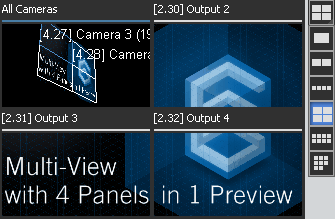 The Preview of version 6 can be toggled to a Multi-View window. Per default you see one view port as usual, but now you can also choose to work with a split view with 2, 4 or 8 view ports in various arrays.